Bulk Import Item Codes Using an Excel Spreadsheet
Head Contractor Administrators can use the Excel import feature in Virtual Superintendent to create or update multiple item codes in bulk.
This feature allows you to download a template, populate or edit item code data, and import it to quickly manage large volumes of item codes.
The import process allows you to:
- Create multiple item codes in a single import
- Bulk edit existing item codes
- Schedule future item prices in bulk
- Maintain consistency across project cost structures
Note: To manually create item codes, refer to the Create an Item Code help article.
In this article
Permissions
To access the Dockets Setup page (Menu > Dockets Setup) and import item codes, you must have one of the following permissions:
- Admin Manager
- Dockets Super User
Download the Item Codes Excel Template
Before importing item codes, you must download the Excel template.
To download the template:
- Sign in to Virtual Superintendent.
- Click Menu > Dockets Setup. The Dockets Setup page opens.
-
Click the Item Codes tab.
 Click or tap to expand image
 -
Click Import. A contextual menu opens.
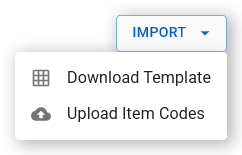 Click or tap to expand image
 -
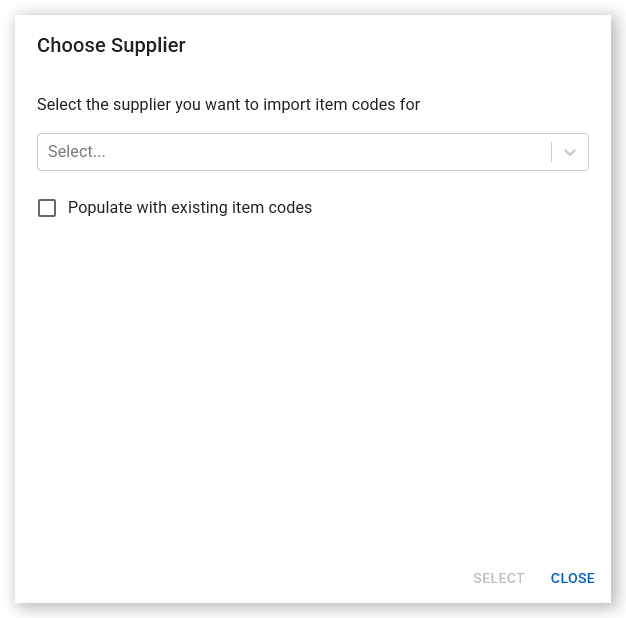
Select Download Template. The Choose Supplier dialog opens.
 Click or tap to expand image
 - Select a Supplier from the dropdown.
- Choose whether the populate the template. Select Populate with existing item codes to include all existing item codes in the template file, allowing you to edit them in bulk. Leave the box empty to download a blank file and add only new item codes.
- Click Select. The template downloads to your computer in .xlsx format using the file name format
vs_Item Code Import Template [Selected Supplier Name]_YYMMDD-HHMMSS. - Open the downloaded file and enter the details of each new or edited item code (see the tables below for required and optional fields). Each row represents a single item code. Once complete, save the file and import it using the Upload Item Codes option.
Required Fields
The following fields must be completed for each item code:
| Field | Description | Validation Rules |
| Item |
The item code's name or identifier.
|
Required; free text
|
| Description |
A short description of the chargeable item. Use consistent naming (for example, CW1, CW1 Double Time, CW2 Laborer Double Time). Subcontractors see this text when creating dockets in the SafeSite app. Consistent descriptions also simplify item code grouping.
|
Required; free text
|
| Price |
The unit price of the item. When editing an existing item code price, the scheduled date of this change is specified using Active From.
|
Required; must be a numeric value |
| Category |
The category assigned to the chargeable item. If a suitable category is not available, select Other.
|
Required; select a valid category from the dropdown
|
| Type |
The type of chargeable item. If a suitable type is not available, select Other.
|
Required; select a valid type from the dropdown
|
| UOM |
The unit of measure used to charge the item. For timesheet suppliers, the UOM must be hours-quantity.
|
Required; must be a valid unit of measure; select a unit from the dropdown
|
| Active |
Controls whether the item can be used by subcontractors.
|
Required; Yes or No; select from the dropdown
|
| Visible |
Controls whether the item appears in SafeSite and Virtual Superintendent. No hides the item from direct selection but allows use within item code groups.
|
Required; Yes or No; select from the dropdown
|
| Project |
Project number used for financial system exports. If not used by your organization, enter any value and ignore during export.
|
Required; free text
|
| PO Number |
Reference number used for financial exports. If not used by your organization, enter any value and ignore during export.
|
Required; free text
|
Note: If Active is set to Yes, the item is available for selection in SafeSite and Virtual Superintendent and can be allocated to dockets. If No the item is inactive and not selectable by subcontractors but still usable in item code groups.
The item code Category provides an additional level of classification for chargeable items. Categories are used in financial exports and reporting to help track and analyze costs across projects, activities, and suppliers.
Item code Type defines the type of docket generated (for example, labor or plant) and are used for financial exports and reporting. They help categorize costs so you can analyze spending across projects and activities.
In the template:
- Required columns are highlighted in blue with column titles appended with (Req)
- Optional columns are highlighted in green
Optional Fields
The following fields can be used to provide additional item code information:
| Field | Description | Validation Rules |
| ID |
Internal identifier value. Only present in populated templates.
|
Do not edit or remove
|
| Price Reference | A reference used to integrate with external cost tracking systems and tied to price. | Free text |
| Active From |
Date a price change becomes active.
|
Must be a valid date; must be in the future (earliest date is tomorrow)
|
| Sign-On Profile |
Defines the steps a user must complete when signing on in SafeSite. Select a profile that matches the item code type (for example, labor profile for labor item codes). Projects may use default or custom profiles.
|
Must be a valid profile; select from the dropdown
|
| Minimum Duration | The minimum billable hours when UOM is hours. | Must be a numeric value |
| Minimum Quantity | The minimum billable quantity when UOM is any value other than hours. | Must be a numeric value |
| Load Site (Del) |
Load site for a weighbridge item code. Used together with the disposal site to calculate tonnage rates.
|
Must be valid location; select from the dropdown |
| Disposal Site (Del) |
Disposal site for a weighbridge item code. Used together with the load site to calculate tonnage rates.
|
Must be valid location; select from the dropdown |
Caution: Populated templates include an ID column. Do not edit, remove, or enter values in this column.
For best results, we recommend that you:
- Download the Excel template each time you begin the import process. Virtual Superintendent may update the template at any time, and using the latest version helps prevent errors.
- Use dropdown lists where available.
- Ensure quantities match the correct unit of measure.
- Verify that locations exist in Virtual Superintendent.
- Copy and paste data carefully to avoid formatting issues.
- Start with a small test upload before importing large datasets.
- Save the template regularly to avoid losing changes.
Import an Edited Excel Template
- Sign in to Virtual Superintendent.
- Click Menu > Dockets Setup. The Dockets Setup page opens.
-
Click the Item Codes tab.
Click or tap to expand image -
Click Import. A contextual menu opens.
Click or tap to expand image -
Select Upload Item Codes. The Import Item Codes dialog opens.
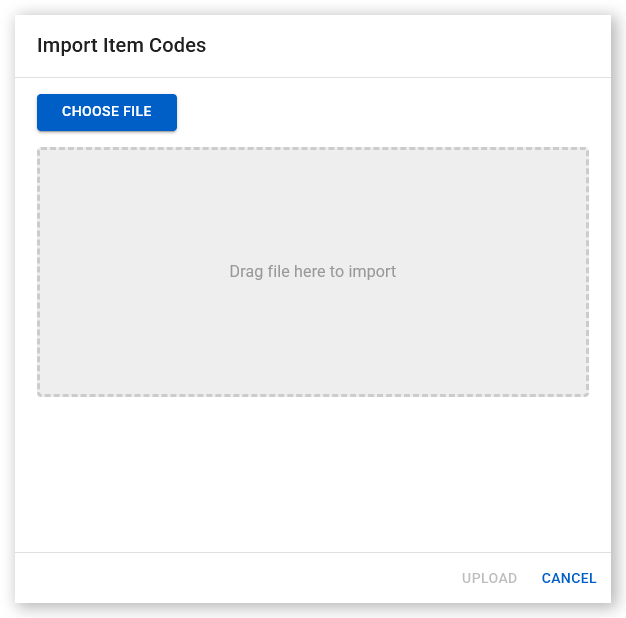 Click or tap to expand image
 - Click Choose File to open your file explorer, select the import file, and click Open. Alternatively, drag and drop the import file into the Drag file here to import area. Your import file must be in .xlsx format.
-
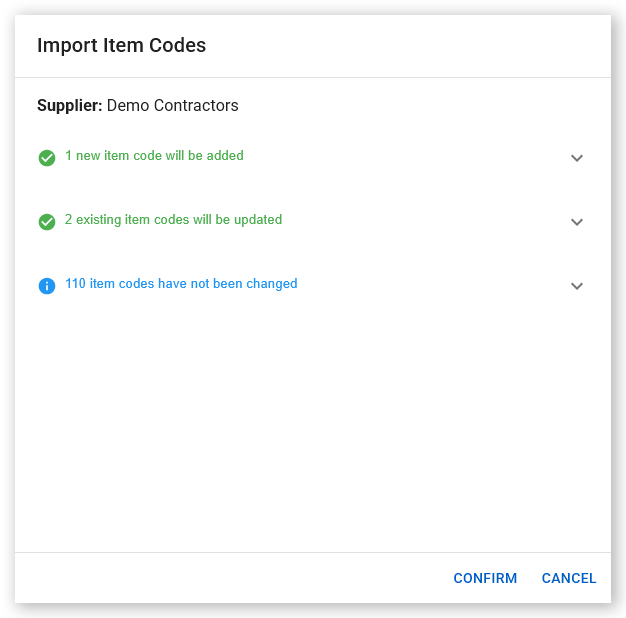
Click Upload. Virtual Superintendent uploads and validates the file. A preview showing the number of item codes that will be added or updated is displayed, along with the number of existing item codes that will not be changed. If any rows fail validation, an orange text alert shows the number of item codes that will be skipped (not imported). Click the downward arrow to view each error, including the issue and the affected row. Correct the errors in your file and try again.
 Click or tap to expand image
 -
Click Confirm. New item codes are created and existing item codes are updated for all valid rows.
 Click or tap to expand image
 - Click Finish. New item codes are created, and existing item codes are updated for all valid rows. The results are displayed in the Item Codes list.
Video Guide
The following video demonstrates the item code spreadsheet import feature: