Use SSO to Sign In
This article explains how single sign-on (SSO) works in Virtual Superintendent when using an external identity provider.
Virtual Superintendent supports SSO using OpenID Connect (OIDC) through AWS Cognito.
In this article
Note: Automatic user provisioning using tools such as SCIM is not supported.
What is single sign-on (SSO)?
Single sign-on (SSO) allows users to access multiple systems using one set of login credentials.
Users sign in through your organization’s identity provider. After authentication, they can access Virtual Superintendent without signing in again.
What are the benefits of SSO?
Using SSO provides the following benefits:
- Your organization controls authentication and security policies
- Users sign in once and access Virtual Superintendent without additional login steps
- Users do not need to manage multiple usernames and passwords
How the SSO process works in Virtual Superintendent
Virtual Superintendent uses AWS Cognito to manage authentication. Cognito connects to your identity provider using OIDC.
The following steps describe the typical OIDC flow.
Step 1. User signs in to your identity provider
The user signs in to your organization’s identity provider, such as Azure Active Directory. The identity provider verifies the user’s credentials.
Step 2. User accesses Virtual Superintendent
The user opens Virtual Superintendent or selects a link from your internal system. Virtual Superintendent redirects the user to the identity provider if they are not already authenticated.
Step 3. Identity provider returns authentication data
After successful authentication, the identity provider returns an authentication response to AWS Cognito.
This response includes:
- An ID token
- User identity attributes such as email and name
Step 4. Cognito validates the response
AWS Cognito:
- Verifies the authentication token
- Validates the user identity
- Maps the user to an existing Virtual Superintendent account
Step 5. Virtual Superintendent signs in the user
If the user account exists and is active:
- The system creates a session
- The user is signed in to Virtual Superintendent
Required configuration for OIDC
To configure OIDC, the following values must be provided:
- openid-configuration URL
- client_id
- client_secret
Your identity provider must return:
- name
Optional attributes which will be consumed if provided:
- given_name
- family_name
Configuration values for production:
- redirect platform: Web
- redirect uri: https://auth.myvirtualsuper.com/oauth2/idpresponse
Configure Azure Active Directory for OIDC
Follow these steps to register and configure an application in Azure Active Directory (Azure AD) for use with Virtual Superintendent.
Step 1. Register a new application
To register the application:
- Sign in to the Azure portal.
- Open Microsoft Entra ID.
- Select App registrations.
- Click New registration.
- Enter the application name as My Virtual Super.
- Select the appropriate account type for your organization (for example, My organization only).
- Click Register.
Step 2 Configure application branding
To configure branding and properties:
- Open the registered application.
- Select Branding & properties.
- Enter the following values:
- Name: My Virtual Super
- Homepage URL: https://www.myvirtualsuper.com/
- Privacy statement URL: https://www.thevirtualsuperintendent.com/privacy-policy
- Upload the logo using this file: https://csl-images-prod.s3.ap-southeast-2.amazonaws.com/VS-Logo.png
Step 3. Configure redirect URL
- Select Authentication.
- Click Add a platform.
- Select Web.
- Enter the redirect URI: https://auth.myvirtualsuper.com/oauth2/idpresponse
- Click Save.
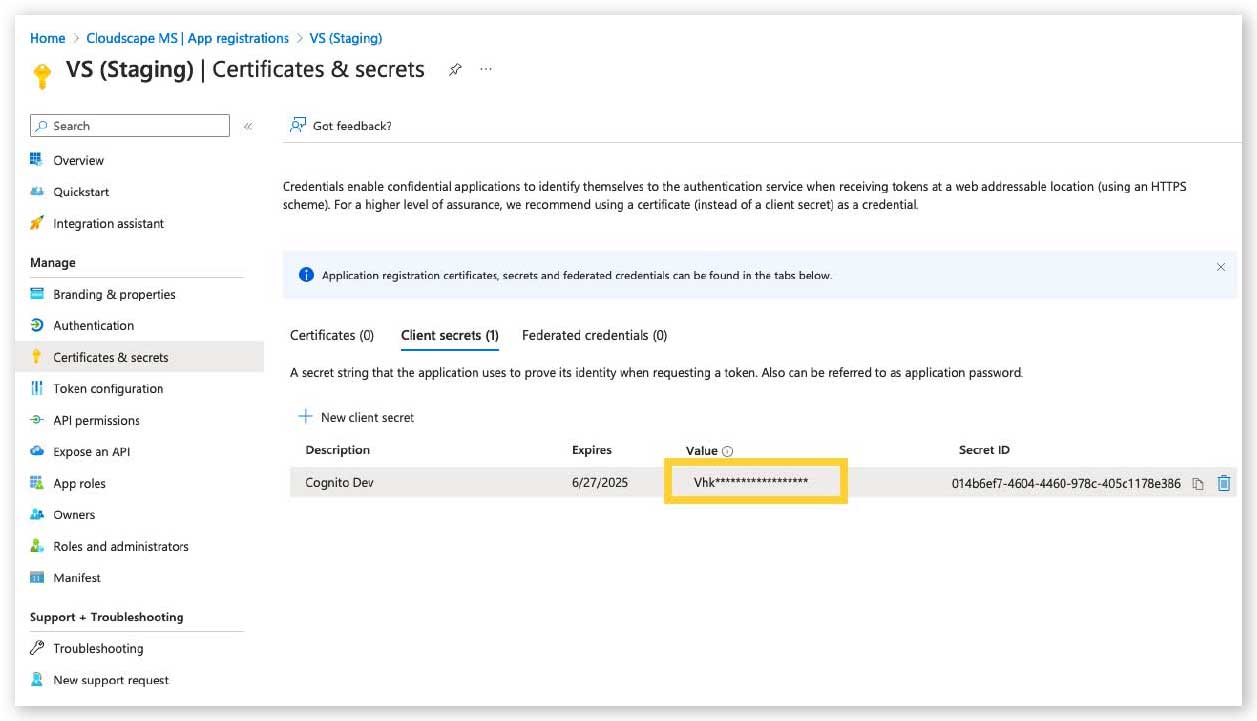
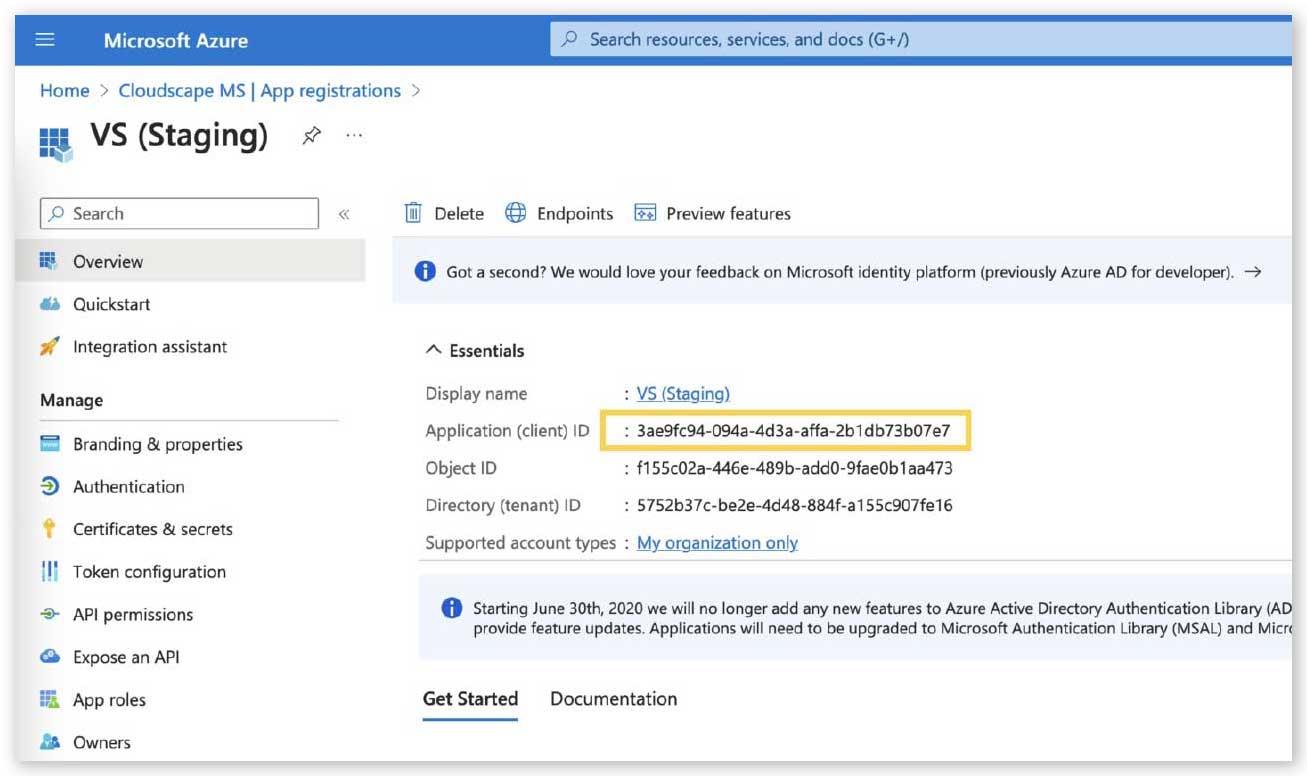
Step 4. Create client credentials
To generate credentials:
- Select Certificates & secrets.
- Click New client secret.
- Enter a description.
- Select an expiry period.
- Click Add.
- Copy the client secret value.
- Copy the Application (client) ID.
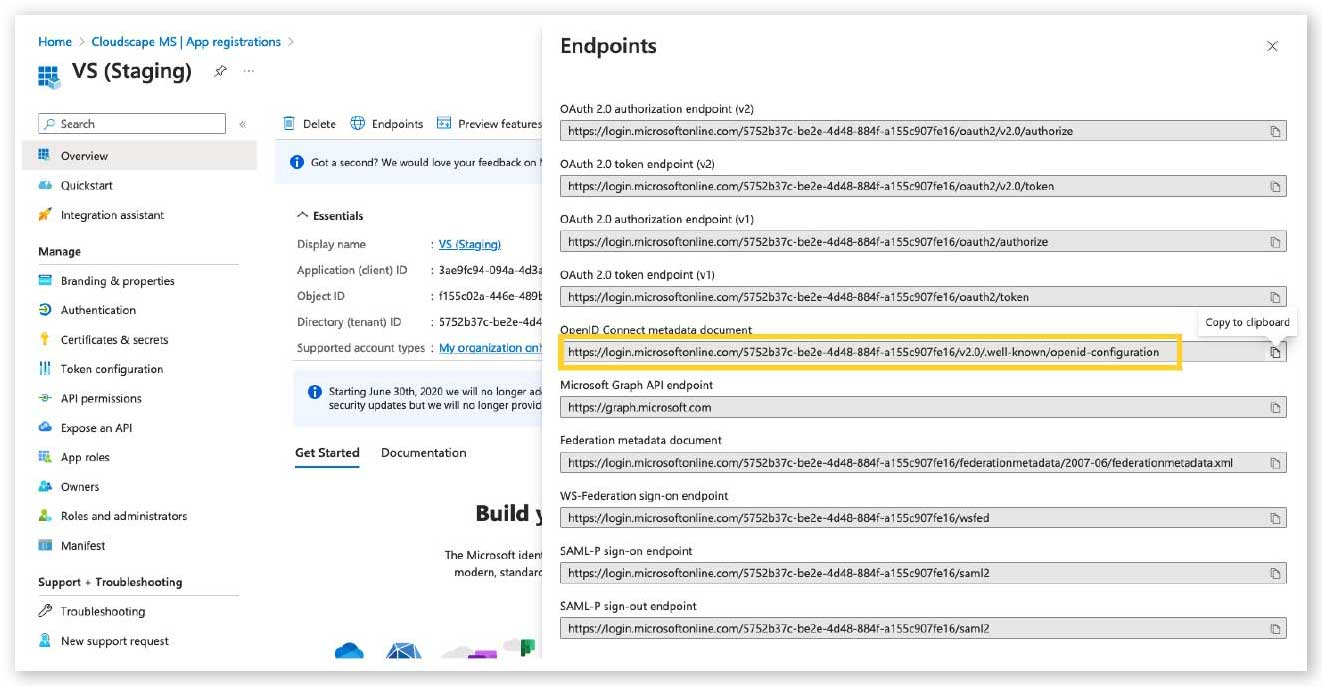
Step 5. Get the OpenID configuration URL
To locate the OpenID configuration URL:
- Select Endpoints from the application overview.
- Copy the OpenID Connect metadata document URL.
Example:
https://login.microsoftonline.com/<tenant-id>/v2.0/.well-known/openid-configuration
Step 6. Verify publisher domain
Note: This step is optional.
To verify the publisher domain:
- Copy the Application ID.
- Create a file named:
microsoftidentity-association.json
- Upload the file to:
https://www.myvirtualsuper.com/.well-known/microsoftidentity-association.json
Next actions
After completing these steps, provide the following values to configure OIDC in Virtual Superintendent:
- openid-configuration URL
- client_id
- client_secret