
Register New Virtual Superintendent Users
When a new user account is created in Virtual Superintendent, the owner of the new account receives an email invitation to complete their account setup (by choosing their account name and password).
Head Contractor Administrators with Admin Manager and User Admin permissions are responsible for creating these invitations for new users, including for subcontractor administrators, and for managing account permissions.
The user's new account is typically configured by the project administrator to align with the requirements of the user’s role as part of the invitation setup process.
This page outlines the steps that the administrator must follow when inviting new users.
In this article
Note: Read the Invite a Dockets Supervisor help article if you want to invite a Dockets Supervisor.
Permissions
To invite a user to Virtual Superintendent, and to edit the permissions of existing users, you must have the following permissions:
- Admin Manager
- User Admin
Note: Assigning a user the Admin Manager permission automatically grants them User Admin rights.
Invite a New User
To invite a new user to create a Virtual Superintendent login:
- Sign in to Virtual Superintendent.
- Click Menu > Users. The Users page opens.
-
Click the Virtual Superintendent Users button in the top menu bar. A grid view opens, showing all Virtual Superintendent users in your project and their permissions.
 Click or tap to expand image
 -
Click Invite User. The Invite User dialog opens.
 Click or tap to expand image
 -
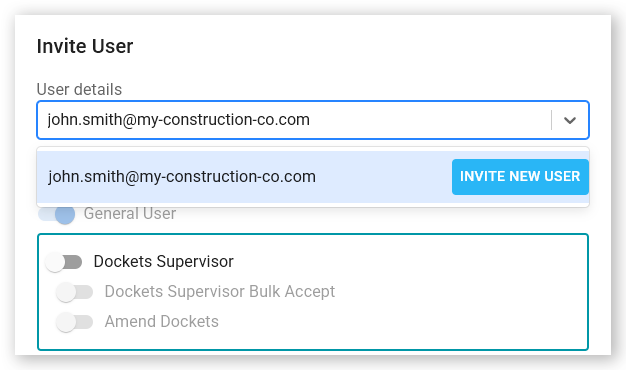
Type (or paste) the new user's email address into the Search for user field then click Invite New User. The title of the dialog changes to Invite New User. This step adds the new user's email address but does not send an invitation.
 Click or tap to expand image
 - Toggle permissions on or off as required for the user's role. For more information about permissions, see the Manage Virtual Superintendent User Permissions help article.
- Click Invite. An invitation is emailed to the address you entered.
After an invitation is sent, the user is added to the Users page with a Reinvite icon shown under the Actions column until the invitation is accepted.
Once their invitation is accepted, an Accepted icon is a shown under the Accepted column.
| Icon | Meaning |
|
|
The user has accepted their invitation. |
|
|
An invitation has been sent to the user and an acceptance is pending. Click the icon to send the invitation again. |


Invite a Subcontractor Administrator to Create a Login
Providing a Subcontractor Administrator with a Virtual Superintendent login allows them to:
- View only the dockets associated with their subcontractor
- Independently invite and manage SafeSite users for their organization
To invite a subcontractor administrator to create a Virtual Superintendent login:
- Sign in to Virtual Superintendent.
- Click Menu > Users. The Users page opens.
-
Click the Virtual Superintendent Users button in the top menu bar. A grid view opens, showing all Virtual Superintendent users in your project and their permissions.
Click or tap to expand image -
Click Invite User. The Invite User dialog opens.
Click or tap to expand image -
Type (or paste) the new subcontractor administrator's email address into the Search for user field then click Invite New User. The title of the dialog changes to Invite New User. This step adds the new user's email address but does not send an invitation.
Click or tap to expand image -
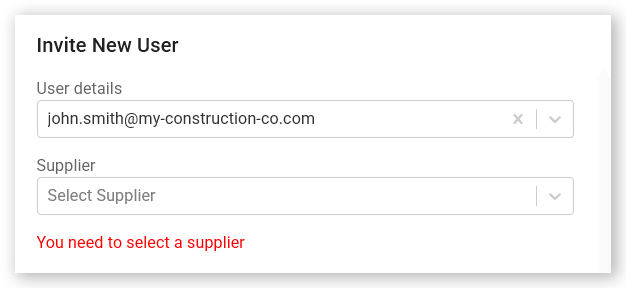
Enable the Subcontractor Admin permission in the Permissions section. This adds the Select Supplier dropdown list to the top of the dialog.
 Click or tap to expand image
 - Search for and select the contractor's company in the Select Supplier dropdown list. You can either type the company name into the field and select a result or open the list, scroll down and manually select a company. The company name is added to the field.
- Click Invite. An invitation is emailed to the address you entered.
After an invitation is sent, the user is added to the Users page with a Reinvite icon shown under the Actions column until the invitation is accepted.
Once their invitation is accepted, an Accepted icon is a shown under the Accepted column.
| Icon | Meaning |
|
|
The user has accepted their invitation. |
|
|
An invitation has been sent to the user and an acceptance is pending. Click the icon to send the invitation again. |
Permission notes
The General User permission is always enabled and cannot be changed.
By default, the User Admin permission is also enabled for Subcontractor Administrators. This allows them to access the Users page and create new SafeSite users. If the User Admin permission is disabled, the head contractor will need to create SafeSite users on behalf of the subcontractor.
Edit User Permissions
Update user permissions
To update a Virtual Superintendent user's permissions:
- Sign in to Virtual Superintendent.
- Click Menu > Users. The Users page opens.
-
Click the Virtual Superintendent Users button in the top menu bar. A grid view opens, showing all Virtual Superintendent users in your project and their permissions.
Click or tap to expand image - Locate the user account you want to edit. Use the filter in the top left corner to filter by name or email address.
- Click the Edit button (pencil) beside the user account under the Actions column. The User Permissions dialog opens.
- Toggle permissions on or off as required for the user's role. For more information about permissions, see the Manage Virtual Superintendent User Permissions help article.
- Click Update. The user's permissions are updated.
Remove a user
To remove a Virtual Superintendent user:
- Sign in to Virtual Superintendent.
- Click Menu > Users. The Users page opens.
-
Click the Virtual Superintendent Users button in the top menu bar. A grid view opens, showing all Virtual Superintendent users in your project and their permissions.
Click or tap to expand image - Locate the user account you want to remove. Use the filter in the top left corner to filter by name or email address.
- Click the Delete button beside the user account under the Actions column. A confirmation dialog opens.
- Click Confirm. The account is removed.