The Allocations Page
The Virtual Superintendent Allocations page allows head contractors to assign spoil removal tasks to transport suppliers and manage those tasks from one central location
Who Can Use the Allocations Page?
- Head contractors: A Virtual Superintendent user with the Spoil Admin permission can create and manage allocation requests.
- Transport suppliers: Once they receive their first allocation request, suppliers automatically gain access to the Allocations Page in their Virtual Super Supplier Portal, where they can Accept, Reject or Update requests.
How Allocations Work
- The spoil admin creates an Allocation Request in the Allocations Page.
- The request is sent to the nominated transport supplier, who will then gain access to the Allocations Page in their Virtual Super Supplier Portal.
- The supplier Accepts and allocates Trucks and Drivers, or Rejects it.
- Drivers complete SafeSite dockets to record the work.
- Once the date passes, the allocation will no longer appear in the Allocations list.
Allocations Workflow
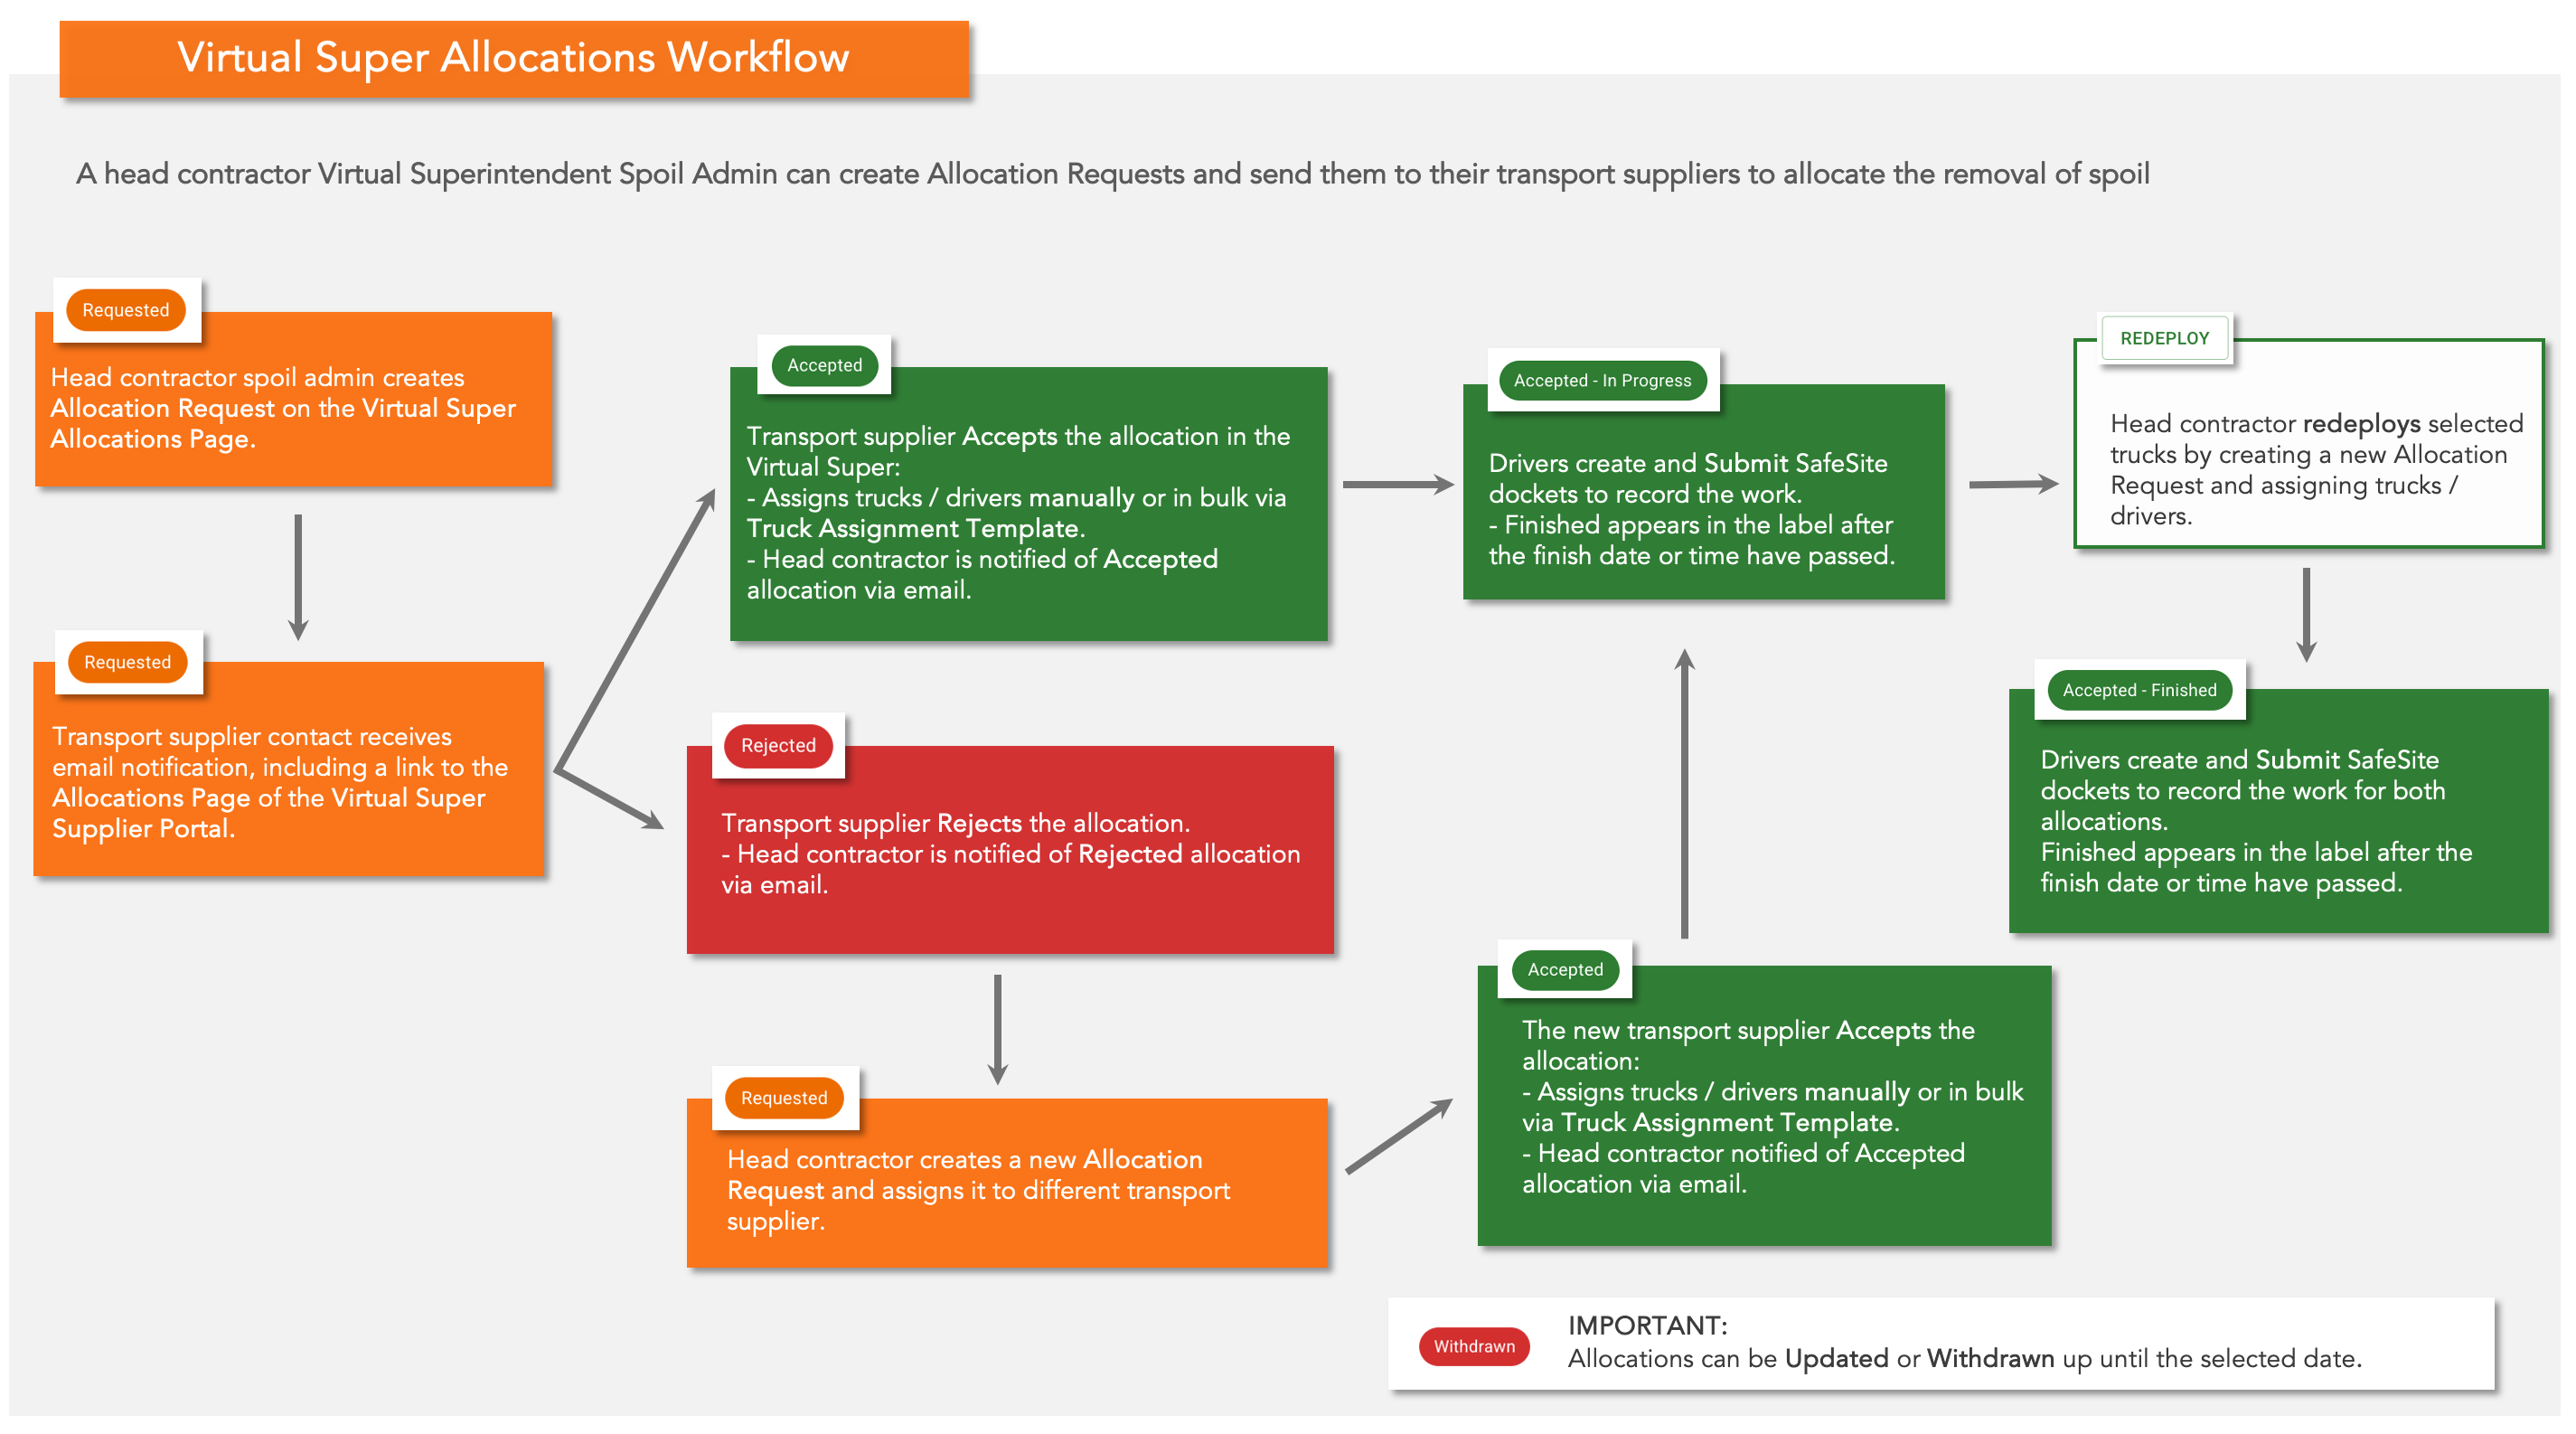
To save the workflow graphic, right click and select Save Image As.
Creating an Allocation Request
-
Go to the Allocations Page in the Virtual Super
-
Click Request Allocation to open a new request


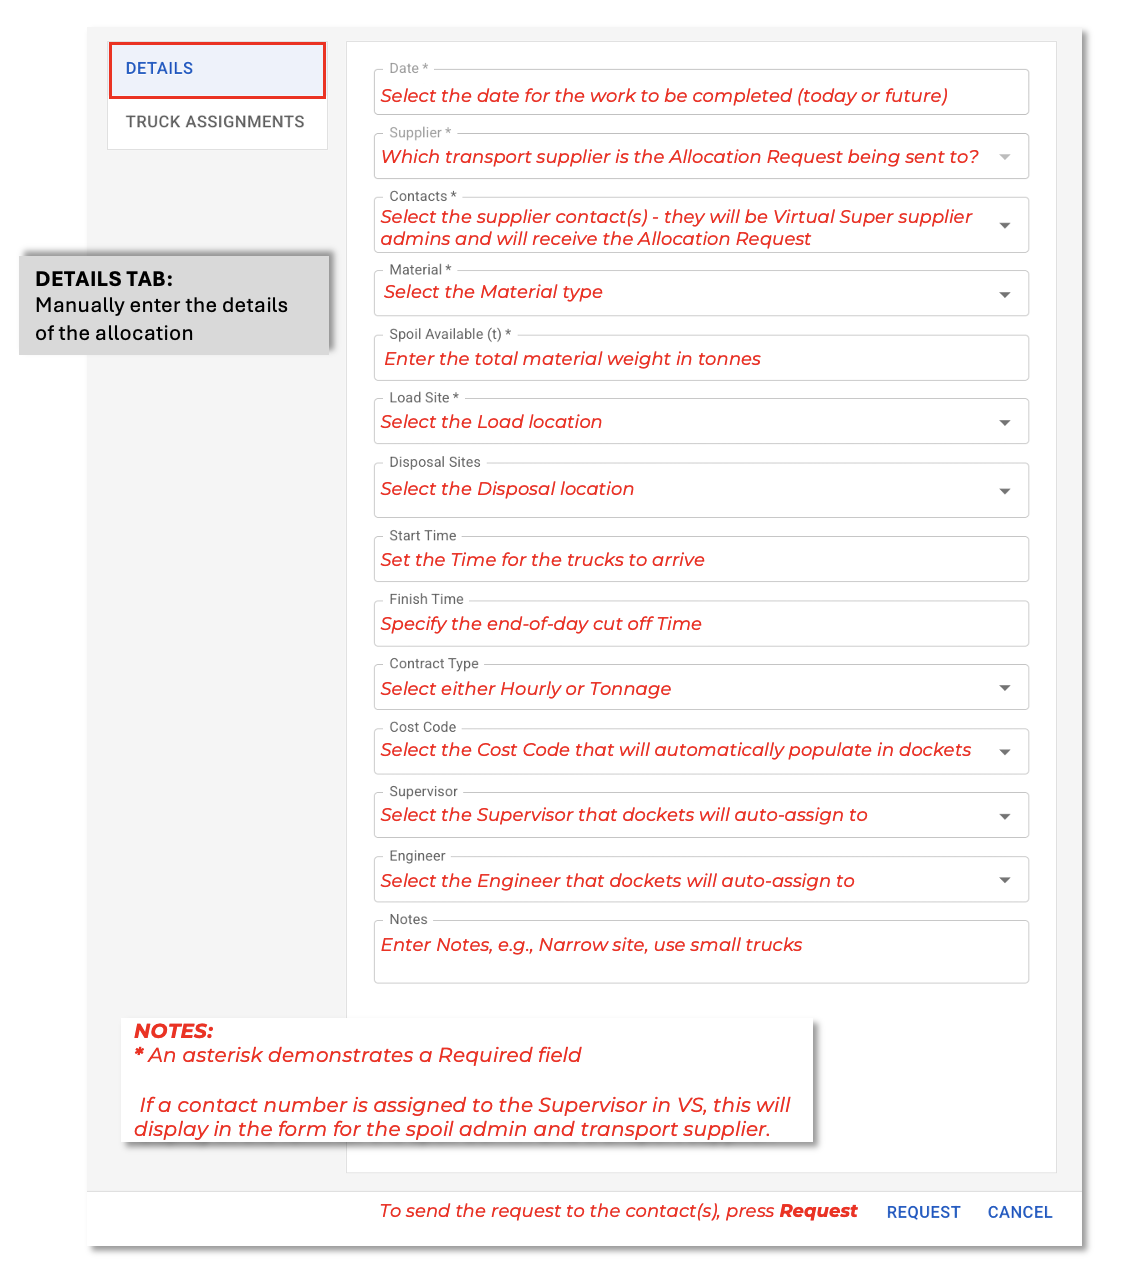
Completing the Details Tab
- Complete all required fields, as demonstrated in the graphic below.
- Filling in the optional fields is entirely optional and not required to proceed.
- Custom Allocation Fields can be created to suit your project – contact the Virtual Superintendent support team at support@virtualsuper.com for assistance.
- If a Supervisor or Engineer is assigned to the allocation, they will receive an email containing a summary of the request and a link to the Allocations Page (view-only).
Truck Assignments Tab
This tab is used by spoil admins when redeploying trucks, which is explained further on in this article.
Editing or Withdrawing Requests
In the Allocations Page, spoil admins see a list of all current requests, each labelled with its status:
- Requested
- Accepted
- Accepted – In Progress
- Accepted – Finished
- Rejected
- Withdrawn
Updating Requests
- Use Update to add or edit details, e.g., edit the Disposal site. Optionally, provide a reason for the change - this will be included in the allocation history.
- Truck assignments, Start/Finish time, and Loads can also be edited after Acceptance.
- The transport supplier will be notified by an email including the new details of the allocation.
Withdrawing Requests
- Use Withdraw if the allocation is no longer required before the allocation date.
-
You must provide a reason for the withdrawal.

- Both the head contractor and transport supplier will see the Withdrawn status. The transport supplier also receives an email notification.
- A withdrawn request remains visible until the allocation date has passed.
-
At any point before the date, a withdrawn request can be reinstated by pressing Update, editing the details, and selecting Request.
You cannot edit the Supplier or Date fields when reinstating a withdrawn request.

Redeploying Trucks
If an allocation has been accepted, on the date of the allocation, a Redeploy button appears at the bottom right:
-
Redeploying creates a new allocation request, running in parallel with the original one.
It is sent to the transport supplier, who will need to accept or reject it.
- This allows trucks to be redeployed mid-shift without cancelling the first allocation.
Example: If half the fleet is needed at a different disposal site, those trucks can be redeployed while the rest continue under the original request.

Completing the Allocation
- On the day of the allocation, assigned drivers create SafeSite dockets to log their work.
- If a Cost Code, Supervisor, or Engineer was entered in the request, those details will automatically appear in the dockets.
- Once the date or finish time is passed, the allocation label will display as Accepted – Finished.
Sending Allocation Summaries
- Use the filter panel on the left-hand side of the Allocations Page to sort by Date, Supplier, Load Site, and/or Disposal Site.
- After filtering, press Email Allocations to send a summary of the filtered allocations to yourself. This email can be forwarded to others (e.g. disposal site personnel) so they know when to expect trucks.

Allocation Notifications
Head contractors can configure notifications to alert key staff when a supplier accepts an allocation, as outlined in this support article.
- A Notify on Accepted Allocation trigger lets you select a Disposal Site and recipients, such as disposal site staff.
- When a transport supplier accepts a request containing the disposal site, an email notification / summary is automatically sent to the chosen recipients.

Viewing Allocation History
To see the history of an allocation:
- Open the allocation.
- Click the three vertical dots in the allocation dialog.
- Select View History to display all changes and updates.

Click for larger view
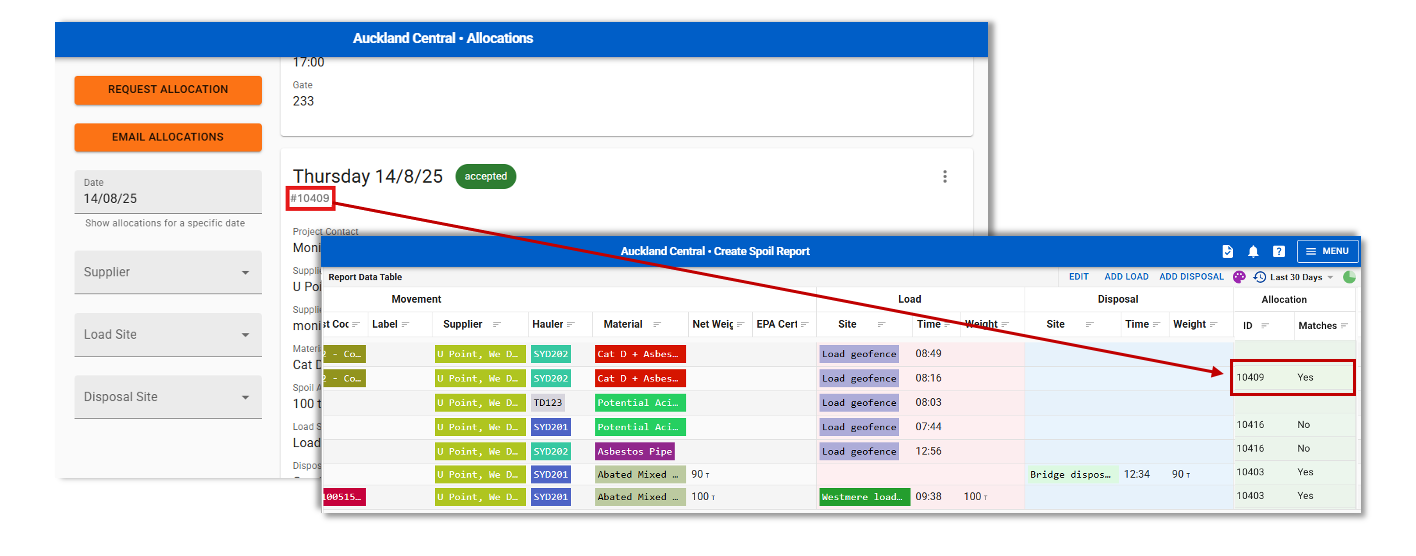
Linking Allocations to Spoil Movements
An allocation can be linked to a spoil movement if the following data matches:
- Date
- Time (if set)
- Truck
If multiple allocations overlap, the following must also match:
- Load site
- Material
- Disposal site
If allocations do not overlap, the first created will be selected.
Each allocation is assigned a unique ID, which appears in the Spoil Report’s Allocation column if it is linked to a spoil movement. The report will also flag if the movement was an exact Match or not.