Bulk Import Cost Codes Using an Excel Spreadsheet
Head Contractor Administrators can use the Excel import feature in Virtual Superintendent to create or update multiple cost codes in bulk.
This feature allows you to download a template, populate or edit cost code data, and import it to quickly manage large volumes of cost codes.
The import process allows you to:
- Create multiple cost codes in a single import
- Bulk edit existing cost codes
- Maintain consistency across project cost structures
Note: To manually create cost codes, refer to the Create a New Cost Code help article.
Permissions
To access the Dockets Setup page (Menu > Dockets Setup) and import cost codes, you must have one of the following permissions:
- Admin Manager
- Dockets Super User
Download the Cost Codes Excel Template
Before importing cost codes, you must download the Excel template.
To download the template:
- Sign in to Virtual Superintendent.
- Click Menu > Dockets Setup. The Dockets Setup page opens.
-
Click the Cost Codes tab.
 Click or tap to expand image
 -
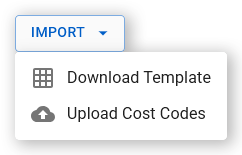
Click Import. A contextual menu opens.
 Click or tap to expand image
 -
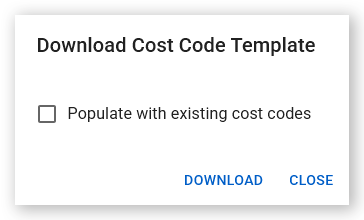
Select Download Template. The Download Cost Code Template dialog opens.
 Click or tap to expand image
 - Choose whether the populate the template. Select Populate with existing cost codes to include all existing cost codes in the template file, allowing you to edit them in bulk. Leave the box empty to download a blank file and add only new cost codes.
- Click Download. The template downloads to your computer in .xlsx format using the file name format
vs_Cost Code Import Template_YYMMDD-HHMMSS. - Open the downloaded file and enter the details of each cost code (see the tables below for required and optional fields). Each row represents a single cost code. Once complete, save the file and import it using the Upload Cost Codes option.
Required Fields
The following fields must be completed for each cost code:
| Field | Description | Validation Rules |
| Cost Code | Unique identifier for the cost code |
Required; free text; must be unique
|
| Name | Name of the cost code |
Required; free text
|
| Project Number |
Project the cost code belongs to
|
Required; must match an existing project
|
| Active |
Determines whether the cost code is available for use
|
Must be Yes or No; select from the dropdown
|
Note: If Active is set to Yes, the cost code is available for selection in SafeSite and Virtual Superintendent and can be allocated to dockets. If No, the cost code is inactive and not selectable.
Optional Fields
The following fields can be used to provide additional cost code information:
| Field | Description | Validation Rules |
| Allocated Quantity |
Total quantity in the UOM assigned to the cost code (for example, 500 tons or 400 hours)
|
Must be a numeric value |
| Budget Rate |
Planned bid rate for the work (for example, 50 dollars per ton)
|
Must be a numeric value |
| Target Rate |
Target rate for completion (for example, 45 dollars per ton)
|
Must be a numeric value |
| Unit of Measure (UOM) |
Measurement unit for the cost code (for example, tons or m3)
|
Must be a valid unit of measure; select a valid unit from the dropdown |
| Locations |
Limits the cost code to specific locations (code can only be used at these locations)
|
Comma-separated list of locations; must be valid locations |
| Owners |
Assigns engineers as owners of the cost code (codes can only be assigned to these engineers in dockets)
|
Comma-separated list of users; must match existing users |
| Stakeholders |
Assigns stakeholders for cost tracking and dashboard reporting
|
Comma-separated list of emails; must match existing email addresses |
| ID | Internal identifier value. Only present in populated templates | Do not edit or remove |
Note: When specifying Locations, enter names exactly as they appear in Virtual Superintendent. Use a semicolon to separate multiple values. The first value becomes the default.
When setting Owners and Stakeholders, enter names and email addresses exactly as they appear in Virtual Superintendent. Use a semicolon to separate multiple entries. The first value becomes the default.
In the template:
- Required columns are highlighted in blue with column titles appended with (Req)
- Optional columns are highlighted in green
Caution: Populated templates include an ID column. Do not edit, remove, or enter values in this column.
For best results, we recommend that you:
- Download the Excel template each time you begin the import process. Virtual Superintendent may update the template at any time, and using the latest version helps prevent errors.
- Use dropdown lists where available.
- Ensure quantities match the correct unit of measure.
- Verify that locations, users, and values exist in Virtual Superintendent.
- Copy and paste data carefully to avoid formatting issues.
- Check that stakeholder emails are correctly formatted and valid.
- Start with a small test import before importing large datasets.
- Save the template regularly to avoid losing changes.
Tip: If you are importing a large number of cost codes, consider splitting the file into smaller batches to make troubleshooting easier if errors occur.
Example Import File
A head contractor has been awarded a project to move 500,000 m³ of material from Cut 4b to Fill 4b.
During the tender process, the contractor estimated a budget rate of $3.21 per m³. The target rate for completing the work is $3.00 per m³, providing a margin of $0.21 per m³.
The contractor wants to create a cost code with a single owner and assign it to the relevant locations.
Their import spreadsheet would be populated as follows:
- Cost Code: 92277 (an arbitrary number)
- Name: Dirt Cut 4b to Fill 4b (an arbitrary name)
- Project Number: 1 (an existing project number)
- Active: Yes
- Allocated Quantity: 500000
- Budget Rate: 3.21
- Target Rate: 3.00
- Unit of Measure (UOM): m3 (an existing UOM)
- Locations: Cut 4b; Fill 4b (both locations must already exist in Virtual Superintendent)
- Owners: Eric Ericson (an existing engineer user)
Import an Edited Excel Template
- Sign in to Virtual Superintendent.
- Click Menu > Dockets Setup. The Dockets Setup page opens.
-
Click the Cost Codes tab.
Click or tap to expand image -
Click Import. A contextual menu opens.
Click or tap to expand image -
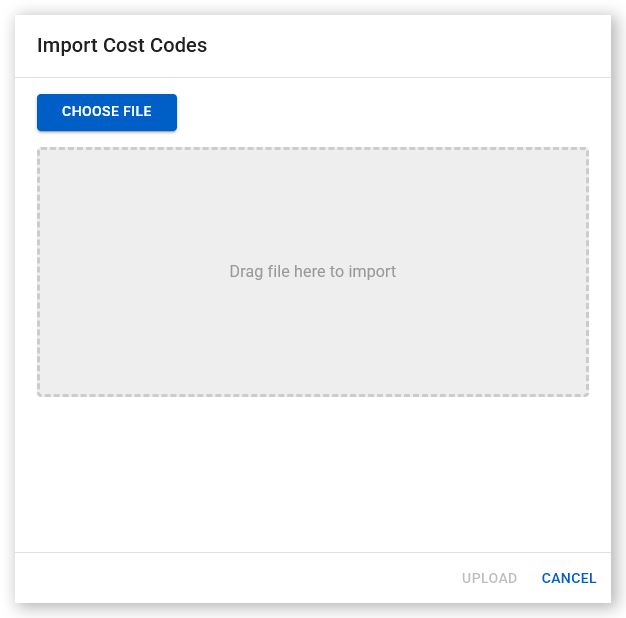
Select Upload Cost Codes. The Import Cost Codes dialog opens.
 Click or tap to expand image
 - Click Choose File to open your file explorer, select the import file, and click Open. Alternatively, drag and drop the import file into the Drag file here to import area. Your import file must be in .xlsx format.
-
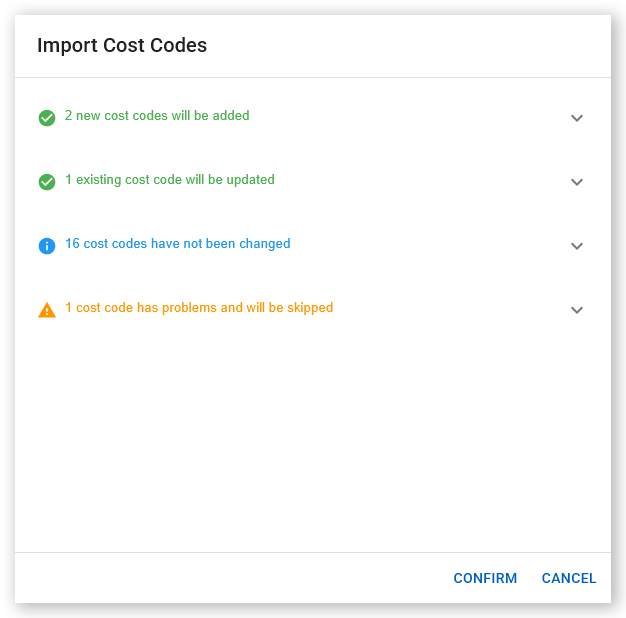
Click Upload. Virtual Superintendent uploads and validates the file. A preview showing the number of cost codes that will be added or updated is displayed, along with the number of existing cost codes that will not be changed. If any rows fail validation, an orange text alert shows the number of cost codes that will be skipped (not imported). Click the downward arrow to view each cost code error, including the issue and the affected row. Correct the errors in your file and try again.
 Click or tap to expand image
 -
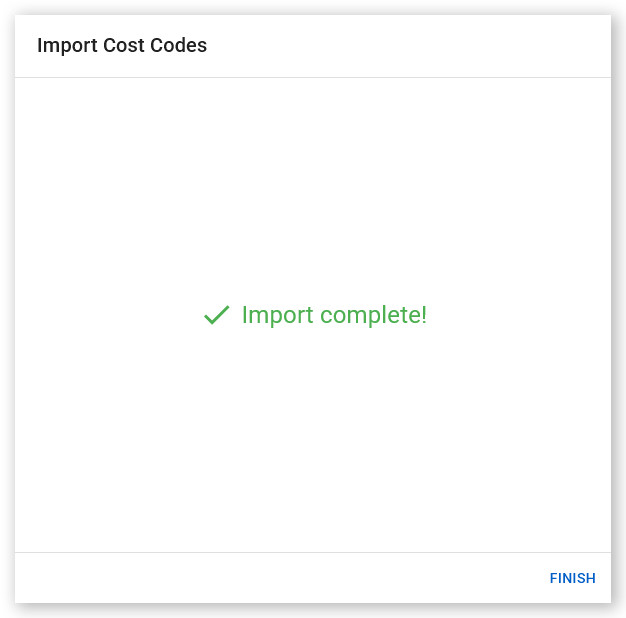
Click Confirm. New cost codes are created, and existing cost codes are updated for all valid rows. The results are displayed in the Cost Codes list.
 Click or tap to expand image
 - Click Finish to complete the process.