
Understand Allocations for Transport Suppliers
Note: The Allocations page is deprecated and available only to legacy users. Transport suppliers users should instead use the Orders page (Menu > Orders) to manage spoil transport requests. Read the Understand Orders for Suppliers help article for more information.
Use the Allocations page (Menu > Allocations) to review and manage allocation requests sent by head contractors, assign trucks and drivers, and track spoil transport work until the allocation is complete.
Transport suppliers and head contractors use the Allocations page to coordinate spoil transport, disposal sites, trucks, drivers, and load requirements.
Note: The Allocations page and Allocations menu option are not visible until you receive your first allocation request. After you receive your first request, the page remains available for future allocations.
In this article
Permissions
To see and manage allocation requests made to your organization on the Allocations page (Menu > Allocations), you must have the following permission:
- Subcontractor Admin
Understand the Allocation Process
When a head contractor sends an allocation request:
- The new allocation appears on the Allocations page with a status of Requested.
- An email summarizing the allocation details and containing a link to the Allocations page is sent to the transport supplier.
- The transport supplier reviews the request and chooses whether to accept or reject it.
- If accepted, the transport supplier assigns trucks and drivers and can update disposal sites, load quantities, and start and finish times.
- Drivers create SafeSite dockets to record their work while the allocation is in progress (has a status of Accepted – In Progress).
- When the allocation date or finish time passes, the allocation finishes (changes status to Accepted – Finished) automatically. The allocation is also removed from the active allocations list after the allocation date or finish time passes.
Any action that changes an allocation automatically triggers an email notification to the head contractor.
Allocation statuses
Allocations move through different statuses as they are requested, accepted, completed, or rejected.
Available allocation statuses are:
| Status | Description |
|---|---|
| Requested | The allocation has been sent by the head contractor and is waiting for the transport supplier to review it. |
| Accepted | The transport supplier has accepted the allocation. |
| Accepted – In Progress | The allocation is active and drivers are completing SafeSite dockets. |
| Accepted – Finished | The allocation has finished. This status appears after the allocation date or Finish Time passes. |
| Rejected | The transport supplier rejected the allocation request. |
| Withdrawn | The head contractor withdrew the allocation before the scheduled date. |
Review and Manage Allocation Requests
Transport suppliers can review allocation requests sent to their organization and accept or reject the work.
To review an allocation request:
- Sign in to Virtual Superintendent.
-
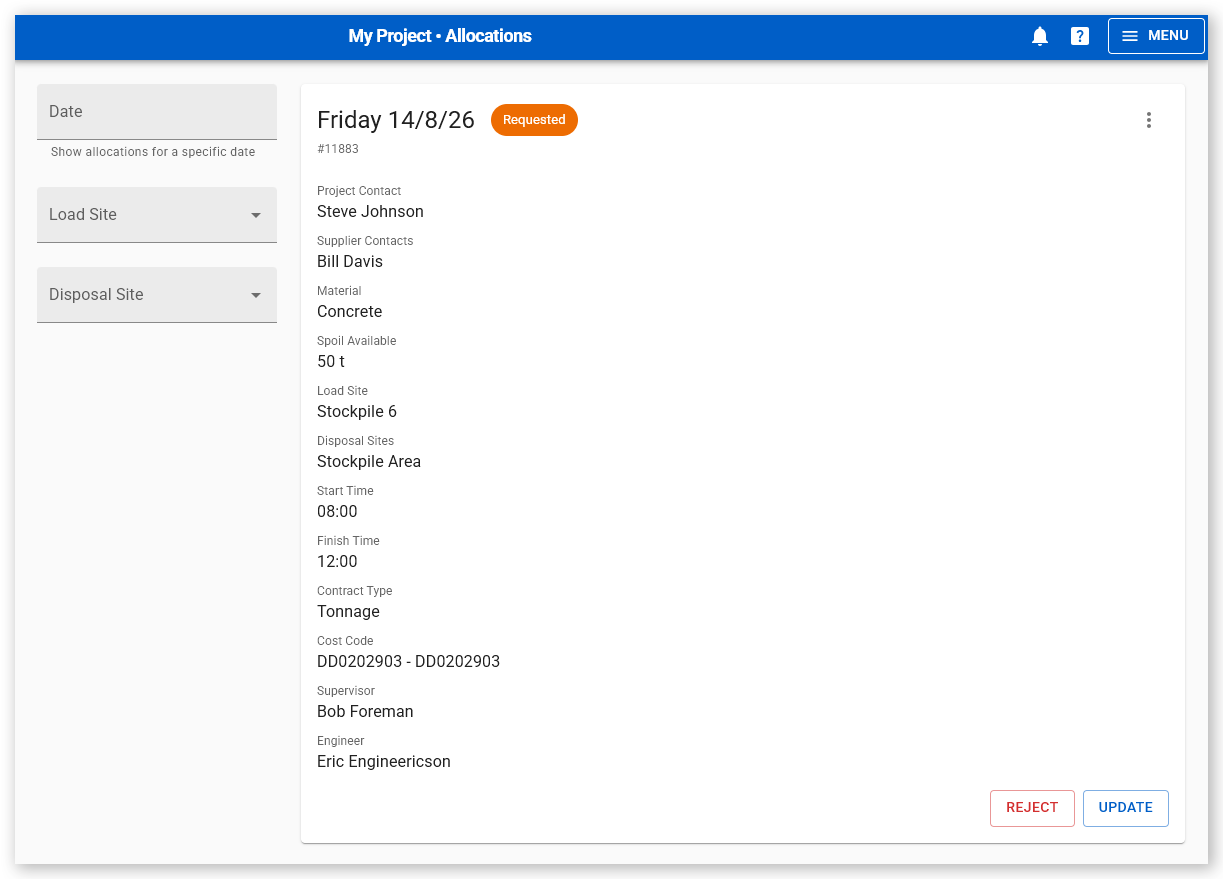
Click Menu > Allocations. The Allocations page opens.
 Click or tap to expand image
 - Locate the allocation using the filters on the left side of the page. You can filter allocations by Date, Load Site, or Disposal Site.
- Review the allocation details.
- Choose whether to accept or reject the allocation.
Note: You can also open an allocation directly from the link in the allocation notification email.
Accept an Allocation
Accept an allocation when your organization can complete the requested work.
Before accepting the allocation, you can:
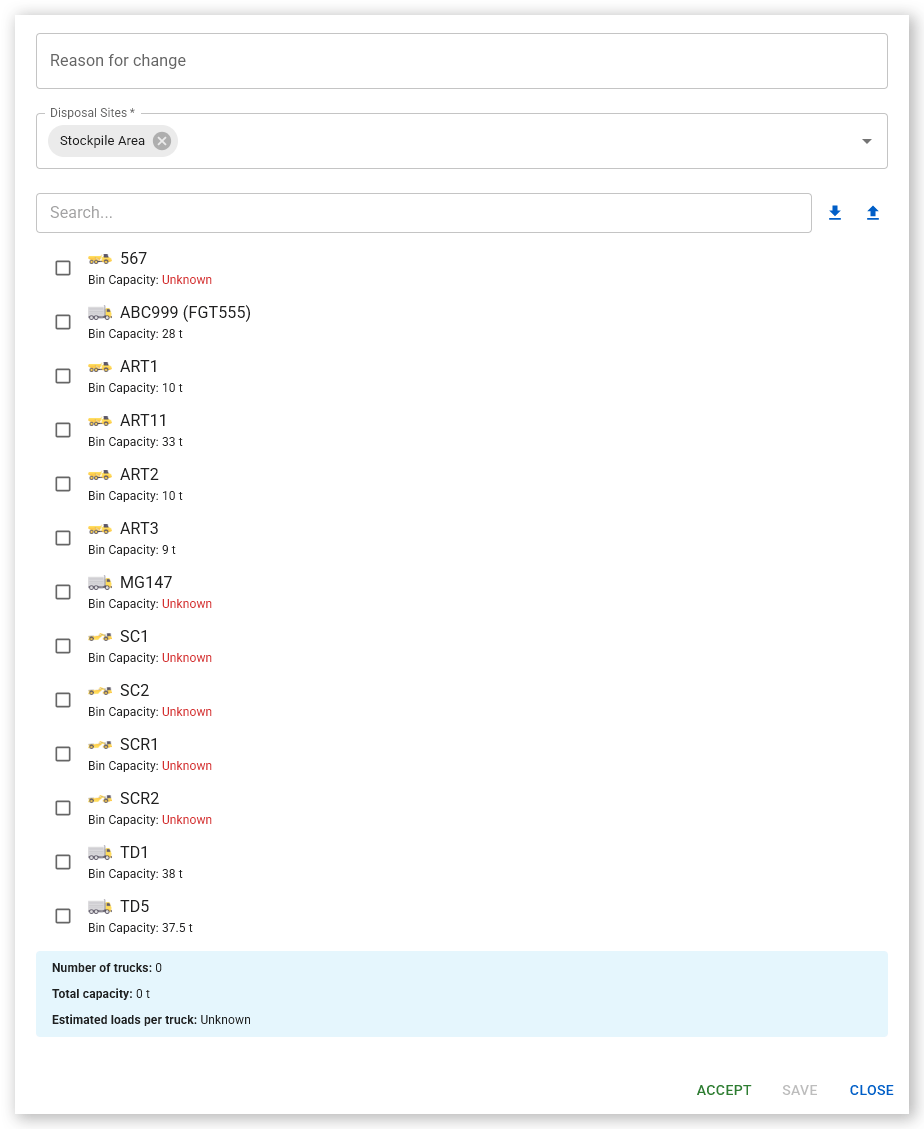
- Add or change Disposal Sites.
- Split the available spoil between multiple disposal sites.
- Assign trucks and drivers.
- Set start and finish times for individual truck assignments.
- Assign the number of loads to individual trucks.
To accept an allocation:
- Sign in to Virtual Superintendent.
-
Click Menu > Allocations. The Allocations page opens.
Click or tap to expand image - Locate the allocation on the Allocations page.
-
Click Update. The Allocation dialog opens.
 Click or tap to expand image
 - Update the disposal site details, if required.
- Assign the required trucks and drivers. See the Assign Trucks and Drivers section below for more information about manual assignment and bulk assignment using an import spreadsheet.
- Update start times, finish times, or loads for individual truck assignments, if required.
-
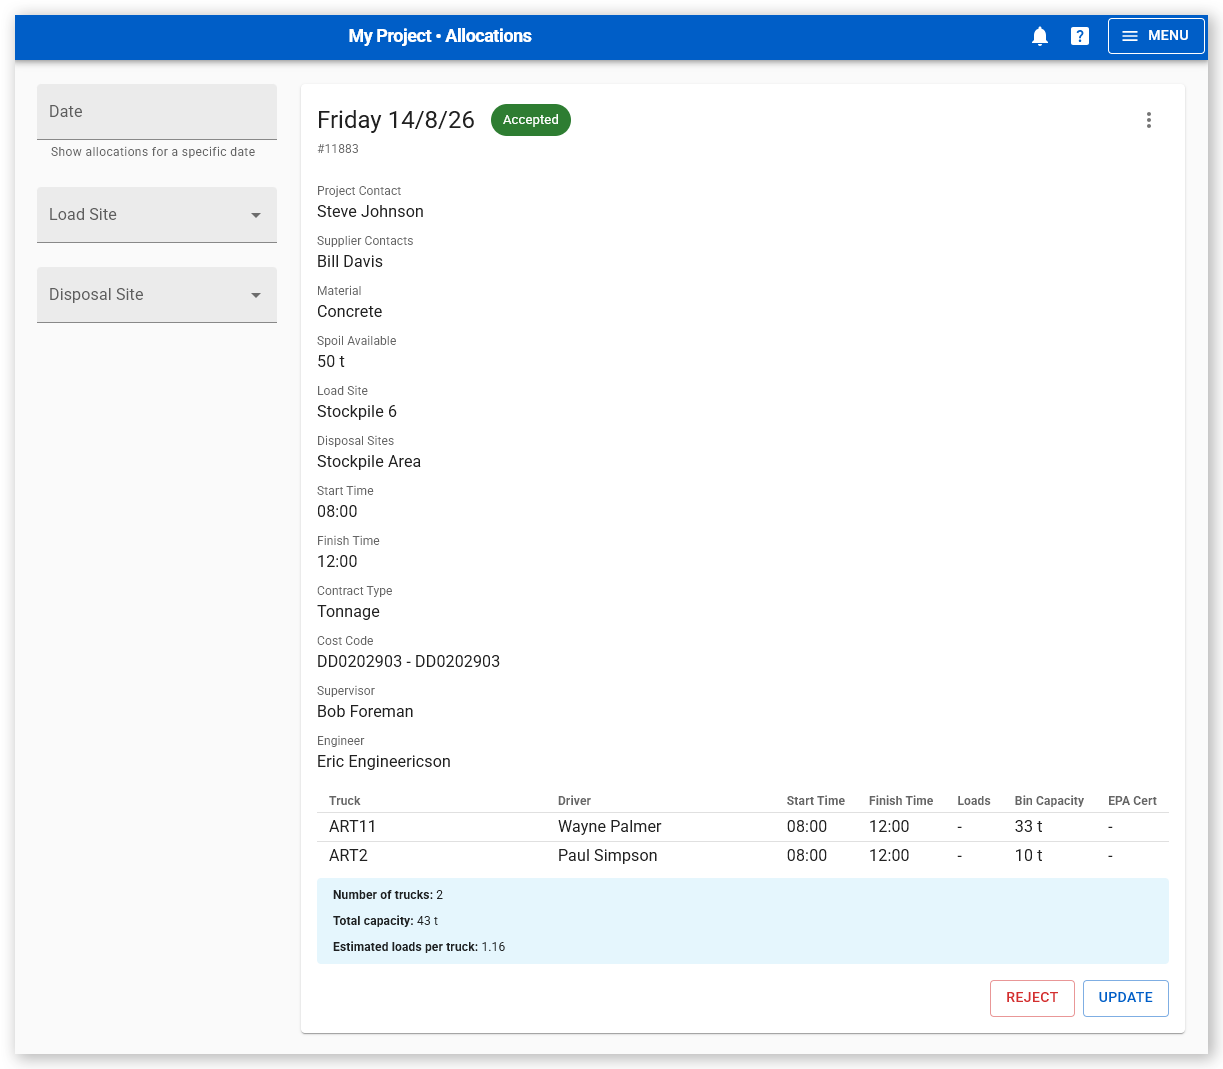
Click Accept. The allocation status changes to Accepted, and an email notification containing the updated allocation details is sent to the head contractor (the person shown under the Project Contact section of the allocation overview).
 Click or tap to expand image
The allocation details are updated in the allocations list to show the allocation:
- Assigned trucks and drivers
- Driver start times
- Driver finish times
- Number of loads assigned to each truck (for split spoil loads)
- Truck load capacities
- EPA certification numbers of the trucks, if any
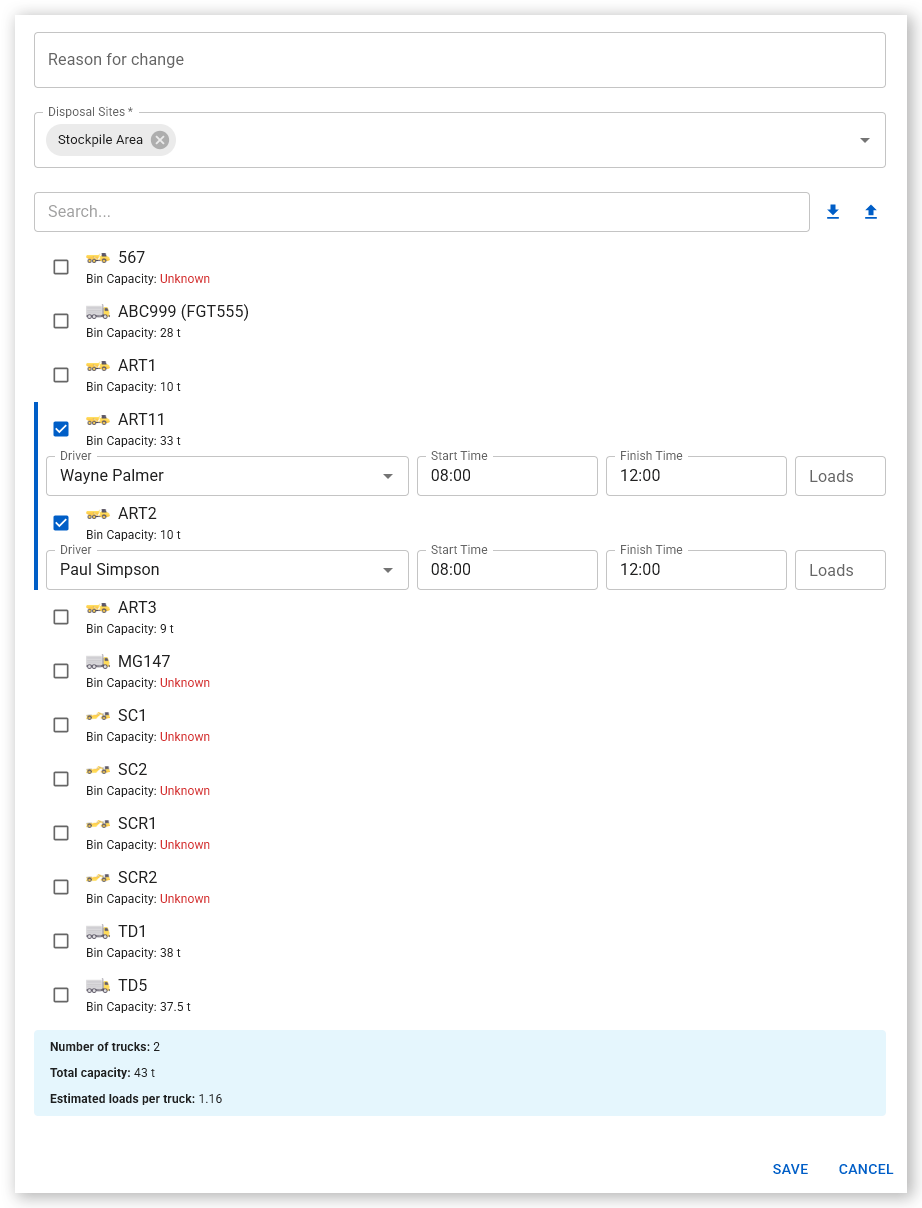
A summary showing the number of trucks assigned, their combined load capacity, and the estimated number of loads required per truck to transport the spoil material to the disposal sites is also shown.
Add disposal sites and split spoil
You can add disposal sites to those specified in the original allocation request.
If the head contractor did not specify a disposal site, you must add at least one before accepting the allocation.
When more than one disposal site is selected, split the total available spoil between the sites.
If you change the disposal site details, enter the reason for the change into the Reason for change field. Changes appear in the allocation summary, in notification emails, and in the allocation history.
Assign Trucks and Drivers
Assign the trucks and drivers that will complete the allocation.
Virtual Superintendent uses the Gross Vehicle Mass (GVM) or Gross Mass Limit (GML) configured for each truck to estimate the number of loads the truck can carry. If both values are configured, the lower value is used.
The estimated load information appears below the list of available trucks.
You can assign trucks and drivers manually or use the Truck Assignment Template to assign multiple trucks and drivers at the same time.
Assign trucks and drivers manually
Manual assignments are useful when assigning a small number of trucks.
To assign trucks and drivers manually:
- Open the allocation.
-
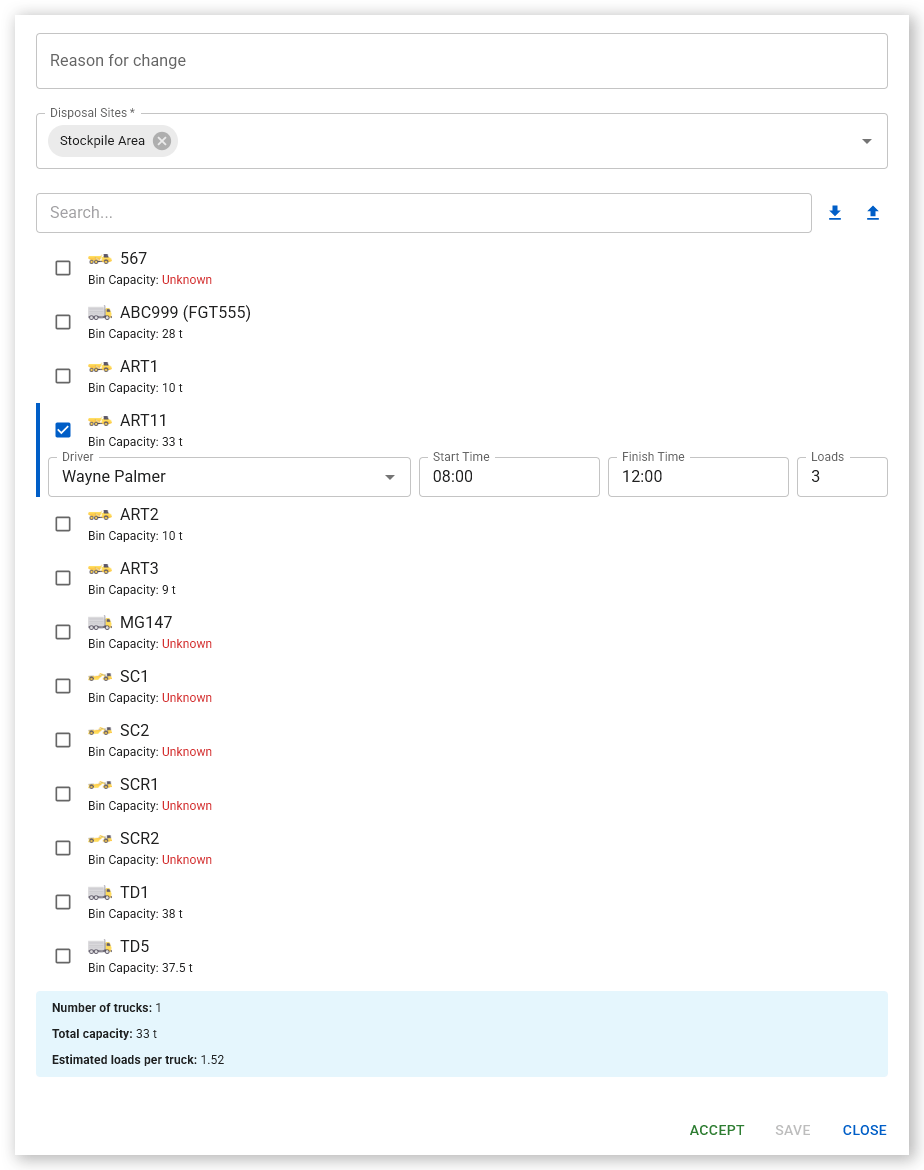
Select a truck from the Trucks list. You can search for a truck using its registration number, secondary registration, or driver name. Once a truck is selected, the Driver dropdown is shown.
 Click or tap to expand image
 - Select a driver from the Driver dropdown. If the truck has been driven recently, its most recent driver is selected automatically. Change the driver if required.
- Repeat these steps for each truck you want to assign.
- Review the calculated Estimated Loads per Truck at the bottom of the dialog.
- Enter a different number of loads assigned to trucks in the Loads field for individual trucks, if required.
- Update the start or finish times for individual assignments, if required.
- Click Accept when you have finished configuring the allocation.
The allocation status changes to Accepted, and the assigned trucks and drivers appear in the allocation summary.
Assign trucks and drivers using a spreadsheet import file
Use the Truck Assignment Template to bulk assign multiple trucks and drivers at the same time.
To assign trucks and drivers using the template:
- Open the allocation.
-
Click the down arrow to download the Truck Assignment Template (an .xlsx format spreadsheet file).
 Click or tap to expand image
 - Open the spreadsheet file and provide the required column details. Enter the trucks and drivers you want to assign, driver start and finish times, and the number of loads assigned to individual trucks, if required.
- Save the template file to your computer.
-
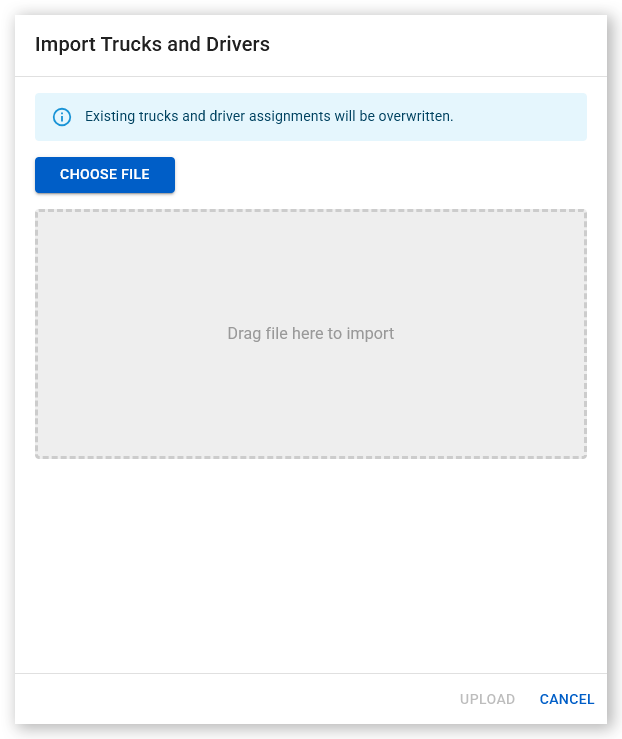
Click the up arrow in the allocation. The Import Trucks and Drivers dialog opens.
 Click or tap to expand image
 - Click Choose File to open your file explorer, select the import file, and click Open. Alternatively, drag and drop the import file into the Drag file here to import area. The truck assignment details are added to the allocation.
- Click Upload.
- Review the imported assignments.
- Click Accept. The allocation status changes to Accepted, and the head contractor is notified.
Spreadsheet import file format
The import spreadsheet file includes the following columns:
| Field | Description | Validation Rules |
| Truck | Plant ID or secondary Plant ID of the truck | Type a value or select from the list; required |
| Driver | Driver name or employee number | Type a value or select from the list; required |
| Start Time | Driver start time | 24-hour format; optional |
| Finish Time | Driver finish time | 24-hour format; optional |
| Loads | Number of loads to be completed by this truck | Optional |
Tip: If a driver has an Employee Number configured in their SafeSite user details, you can use the employee number in the Truck Assignment Template instead of the driver's name under the Driver column. This can help distinguish between drivers with similar names or drivers who use different names in their SafeSite profiles.
Reject an Allocation
Reject an allocation if your organization cannot complete the requested work.
To reject an allocation:
- Locate the allocation on the Allocations page.
-
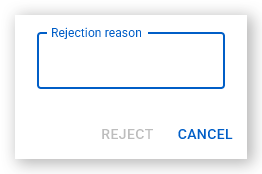
Click Reject. The Reject Allocation dialog opens.
 Click or tap to expand image
 - Type a reason for your rejection in the Rejection reason field.
- Click Reject. The allocation status changes to Rejected on the Allocations page and an email notification is sent to the head contractor notifying them that the allocation was rejected.
Note: You can also reject an allocation after accepting it, provided work has not started.
Update an Accepted Allocation
You can update an allocation after accepting it.
To update an accepted allocation:
- Sign in to Virtual Superintendent.
-
Click Menu > Allocations. The Allocations page opens.
Click or tap to expand image - Locate the accepted allocation on the Allocations page.
-
Click Update. The Allocation dialog opens.
 Click or tap to expand image
 - Edit the required allocation details.
- Enter a reason for the change into the Reason for change field at the top of the dialog. This change reason is recorded in the allocation history.
- Click Save. The allocation is updated, and an email notification containing the changes is sent to the head contractor.
Note: You can also reject an allocation after accepting it, provided work has not started.
Complete Allocations
On the allocation date, assigned drivers create SafeSite dockets to record their work.
After the allocation starts, its status changes to Accepted – In Progress.
If the allocation includes a Cost Code, Supervisor, or Engineer, these details are automatically populated in the dockets created by assigned drivers.
After the allocation date or scheduled finish time passes, the allocation status changes to Accepted – Finished.
View Allocation History
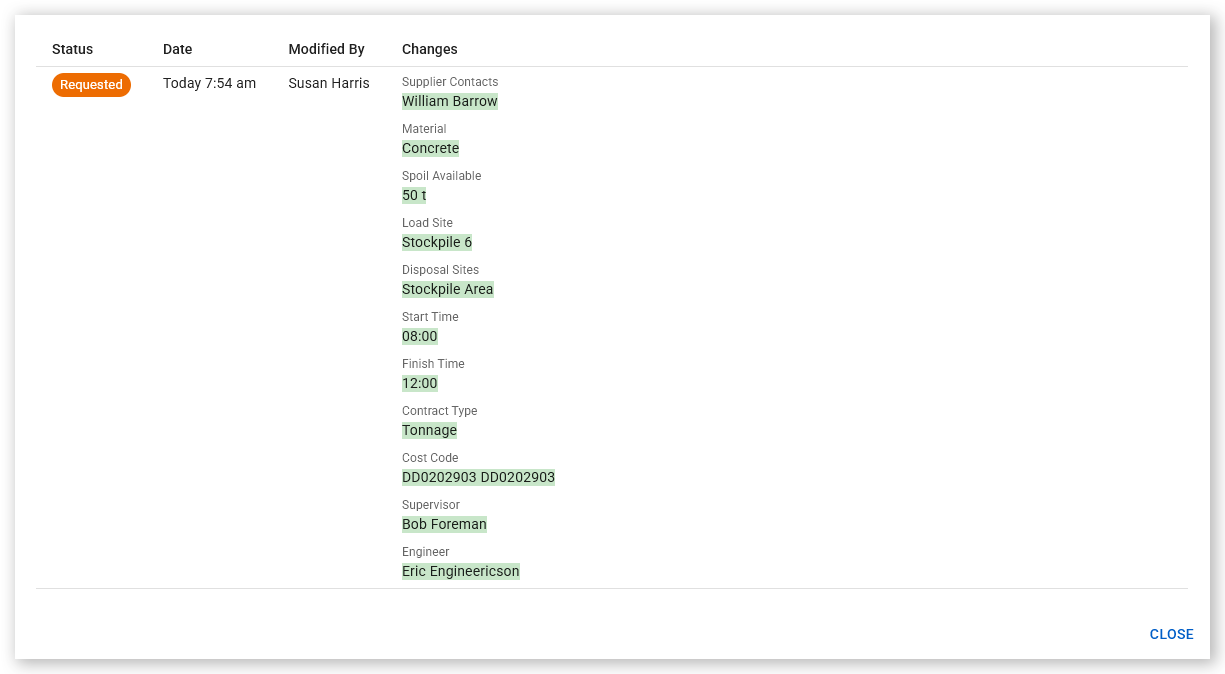
The allocation history provides a timeline of changes to an allocation, including status changes and updates.
To view the history of an allocation:
- Sign in to Virtual Superintendent.
- Click Menu > Allocations. The Allocations page opens.
- Locate the allocation.
-
Click the More actions menu (three vertical dots) in the top-right corner of the allocation summary panel. A contextual menu opens.
 Click or tap to expand image
 -
Click View History. The Allocation History dialog opens, displaying a timeline of changes to the allocation.
 Click or tap to expand image