Virtual Super Orders
The Orders Page in the Virtual Superintendent (VS) allows authorised users to create and send a variety of orders directly to suppliers. Each order is then accepted or rejected by the supplier, allowing the status to be tracked. Auto-generated, unique order numbers can be referenced in dockets or are matched to API-generated delivery dockets, providing a direct link between orders and the dockets recorded in the VS.
Overview
From the VS Orders Page, users can create and manage multiple order types, including:
- Concrete Orders - Create and send concrete delivery orders.
- Concrete Test Orders – Create and send concrete test orders, which can be created individually or as a sub-order to an existing concrete order.
- General Item Orders – Create and send a general order (labour, plant, material).
-
Spoil Transport - Create a spoil transport order.
NOTE: At this stage, full spoil transport functionality is managed through Allocations. This will be merged into the Orders Page in a future release to provide full functionality.
Permissions
To access the Orders Page, a project user must have the VS Order Admin permission enabled.
Once enabled, they can view, create, and update orders, including updating orders that were created by another user.

- Project supervisors and engineers can only see orders that they have been assigned to. Their access is read-only.
- Suppliers can only see all orders for their company, however they can only Accept or Reject the order if they have been assigned as the order's contact.
- Supervisors, engineers and suppliers do not need the Order Admin permission to gain access.
Accessing the Orders Page
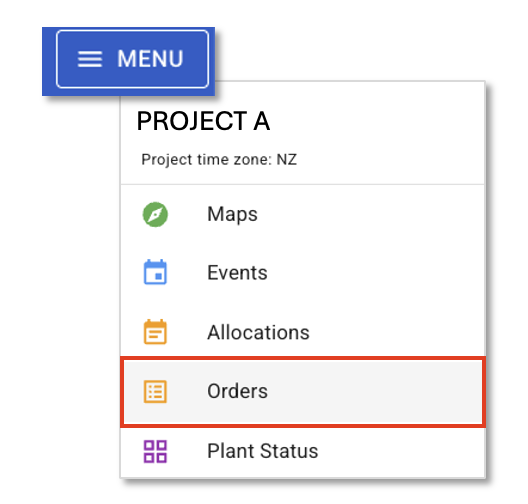
- Open your project in the VS
- Click the Menu icon (☰) in the top right corner
- Select the Orders Page

You will see the order list, with the most recent displaying at the top of the page. The Filter Panel can be used to find and view specific orders, both current or historical.
Orders can be filtered by:
- Order number
- Supplier
- Date Range
- Type
- Status
Additionally, the user can check the following selection boxes to:
- Show sub orders: Demonstrate where a concrete test has been generated as a sub-order to an existing concrete order.
- Only show orders you created: Only display orders created by the user.
Using the Orders Page
From the Orders Page, authorised users can:
- Create orders which are automatically sent to the order's supplier contact(s), via email.
- View orders, including historical orders.
- Update existing order details (up until the date set for the work to commence).
- Track the order status from requested to accepted / rejected / withdrawn.
Creating a New Order
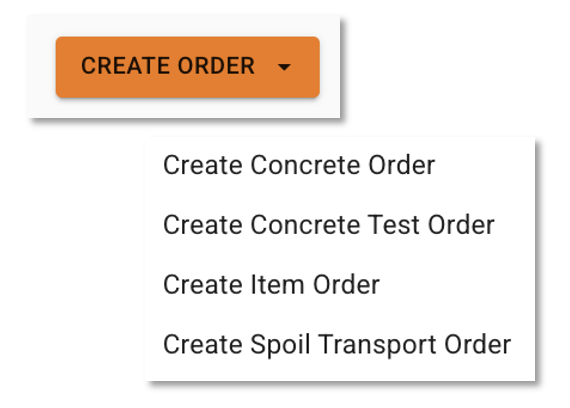
- Click the orange Create Order button.
- Select the order Type from the drop-down list:
- Concrete Order – Create and send a concrete supply order.
- Concrete Test – Create and send an individual concrete test order. A test can also be created as a sub-order which links it to an existing concrete order (see below).
- Item Order – Create an order for any item code, such as labour, materials, or plant.
- Spoil Transport Order – Coming soon. This will eventually replace the Allocations page.
- Enter the required details in the order form.
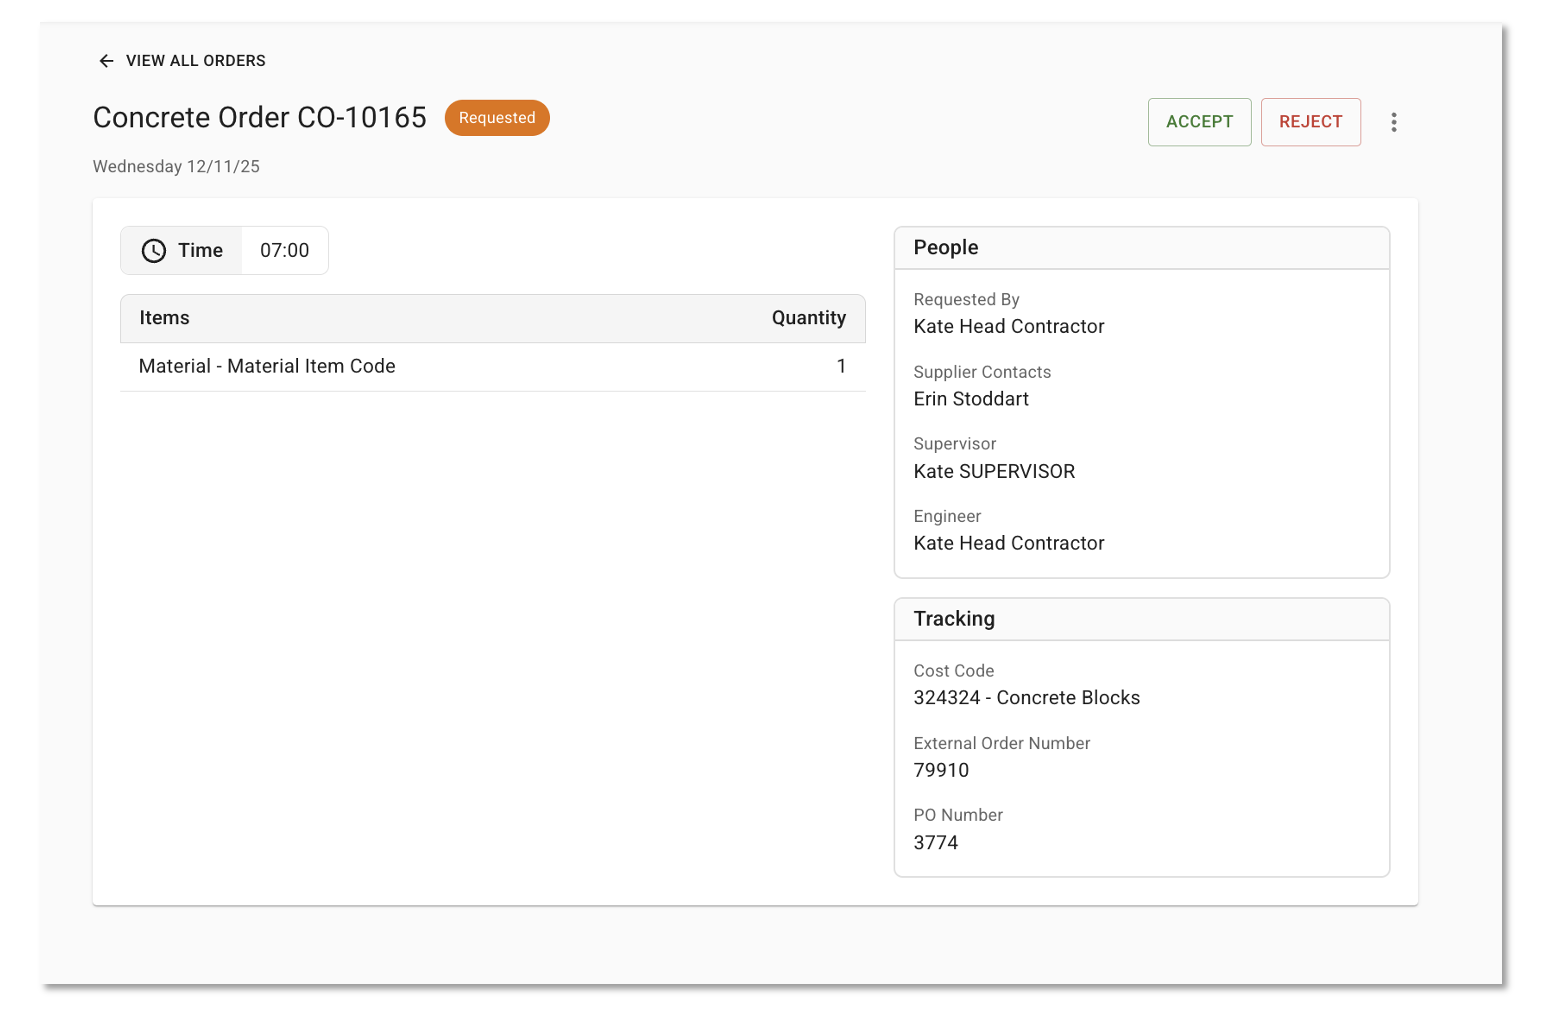
Item Order Example:
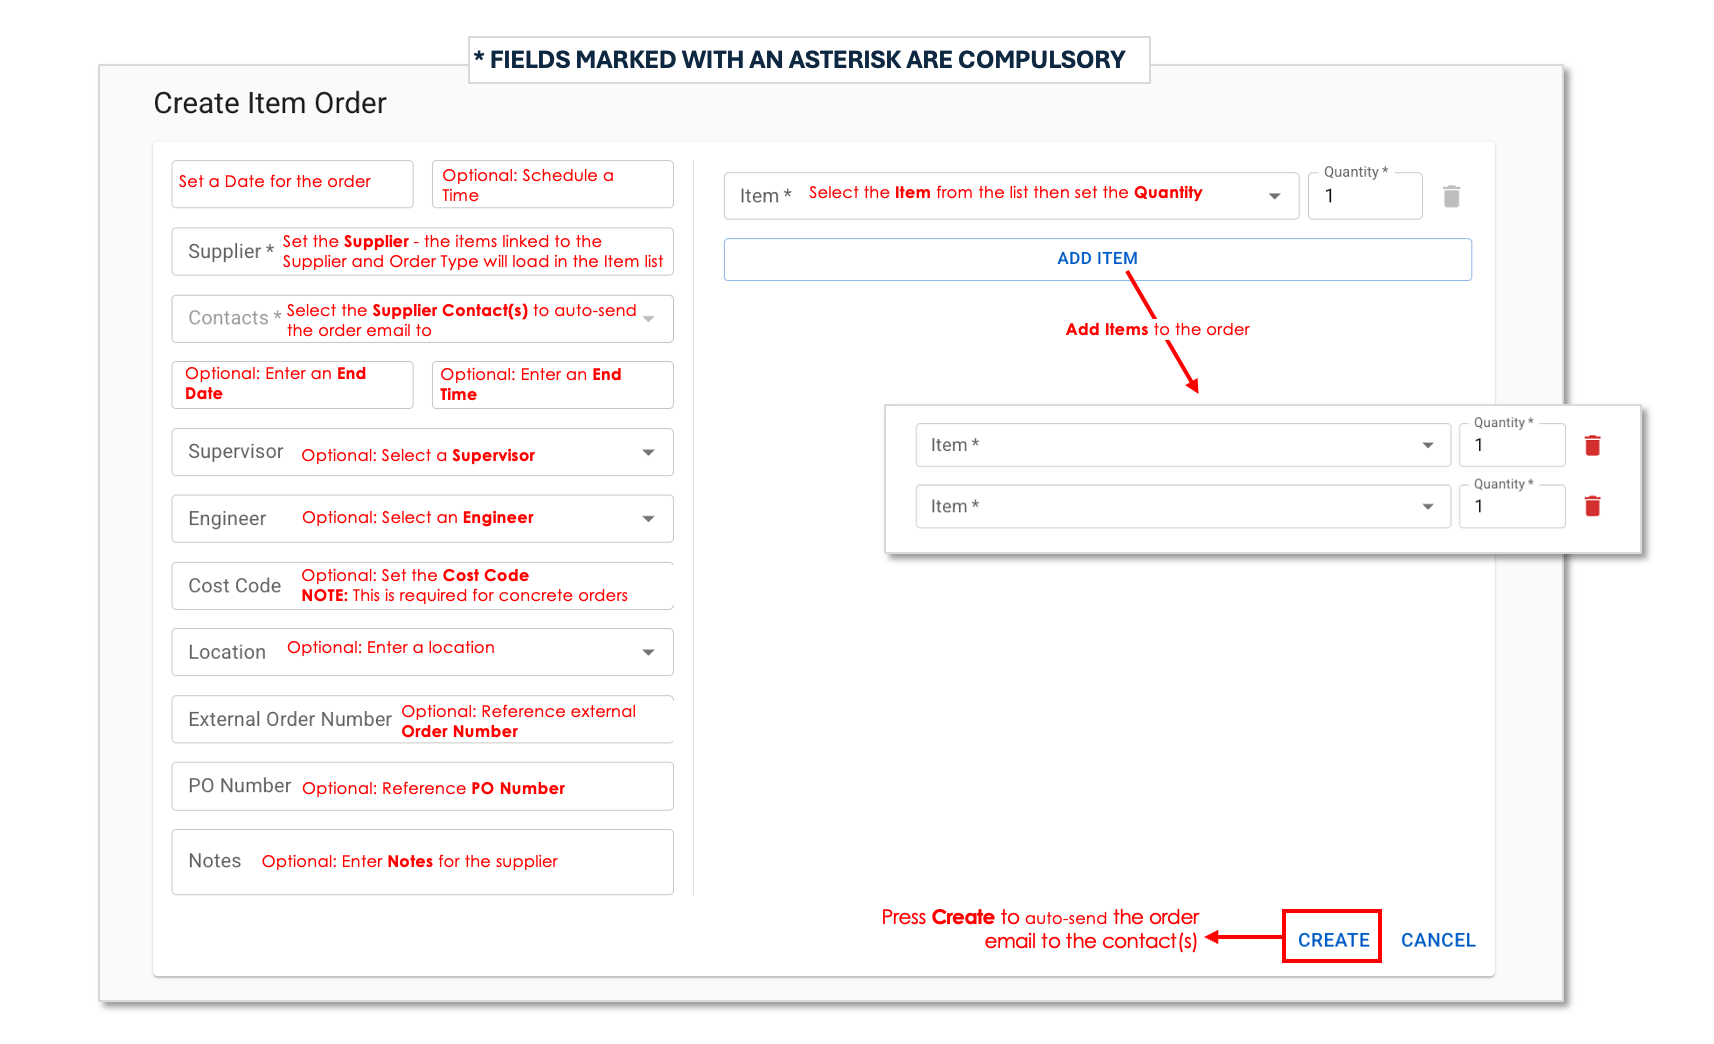
NOTES:
- Order forms can vary slightly depending on the Type of order.
- Fields marked with an asterisk (*) are compulsory.
- The cost code field is only compulsory for a concrete order.
-
Once the Supplier is set, the Item menu will populate with the available Item Codes and Orderable Items for that supplier that match the type of order being created.
Read the following article to understand more about Orderable Items.
- Data in the Supervisor, Engineer, Cost Code and Location fields will populate in the respective VS Dockets.
- Custom fields can be requested by contacting support@virtualsuper.com.
When all details are complete, press Create to automatically send an order email to the supplier contact(s).
An email will automatically send to the creator and the supplier contacts any time an order is created or updated.
Unique Order Numbers
Order numbers are automatically generated based on the order type and will display in the Orders List:
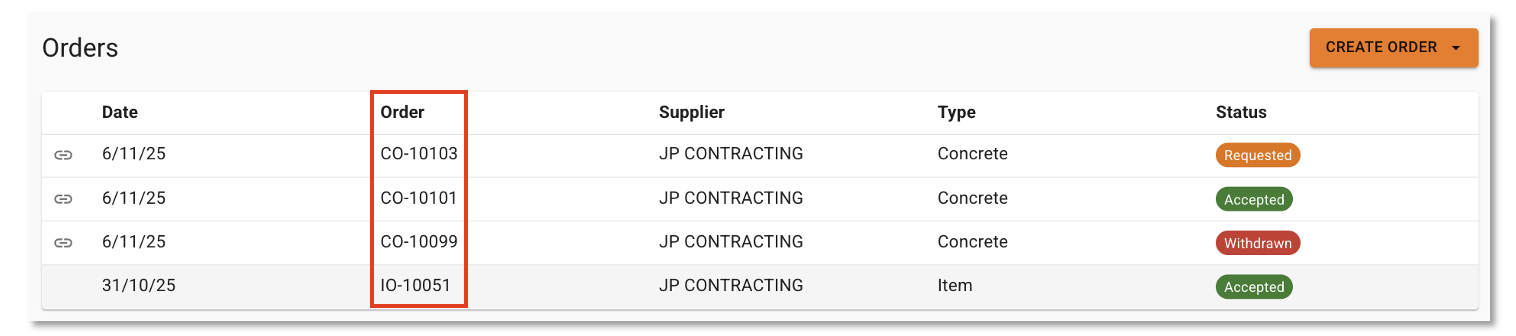
- Concrete Orders: CO-XXXX
- Concrete Test Order: CTO-XXXX
- Item Orders: IO-XXXX
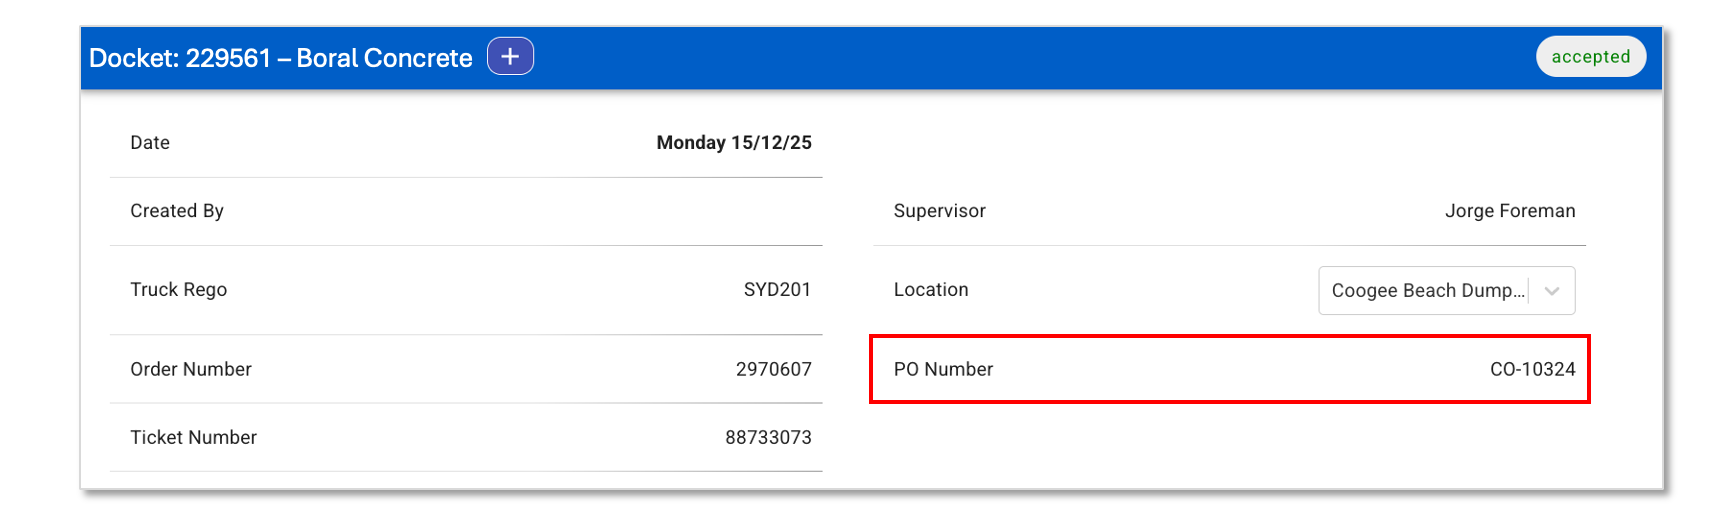
Order Numbers are referenced in the PO Number field at the top of electronic dockets, providing a direct link between orders and the dockets generated in the VS.
Order Status and Actions
Once an order has been sent, it will display a Requested label until the supplier either Accepts (showing an Accepted label) or Rejects (showing a Rejected label) the order through their VS Supplier Portal. If the order creator withdraws the order, it will display a Withdrawn label.

Creator Order Actions
At any stage the creator can update the order details or withdraw it.
- Update – Orders can be edited at any stage before the entered start date. This changes a Rejected or Withdrawn order back to Requested.
- Withdraw – Retract the order. This can only occur before the date/start time set in the order.
Concrete Test Sub-Orders
When viewing a concrete order form, the creator can click Order Concrete Test to generate a linked concrete test sub-order.
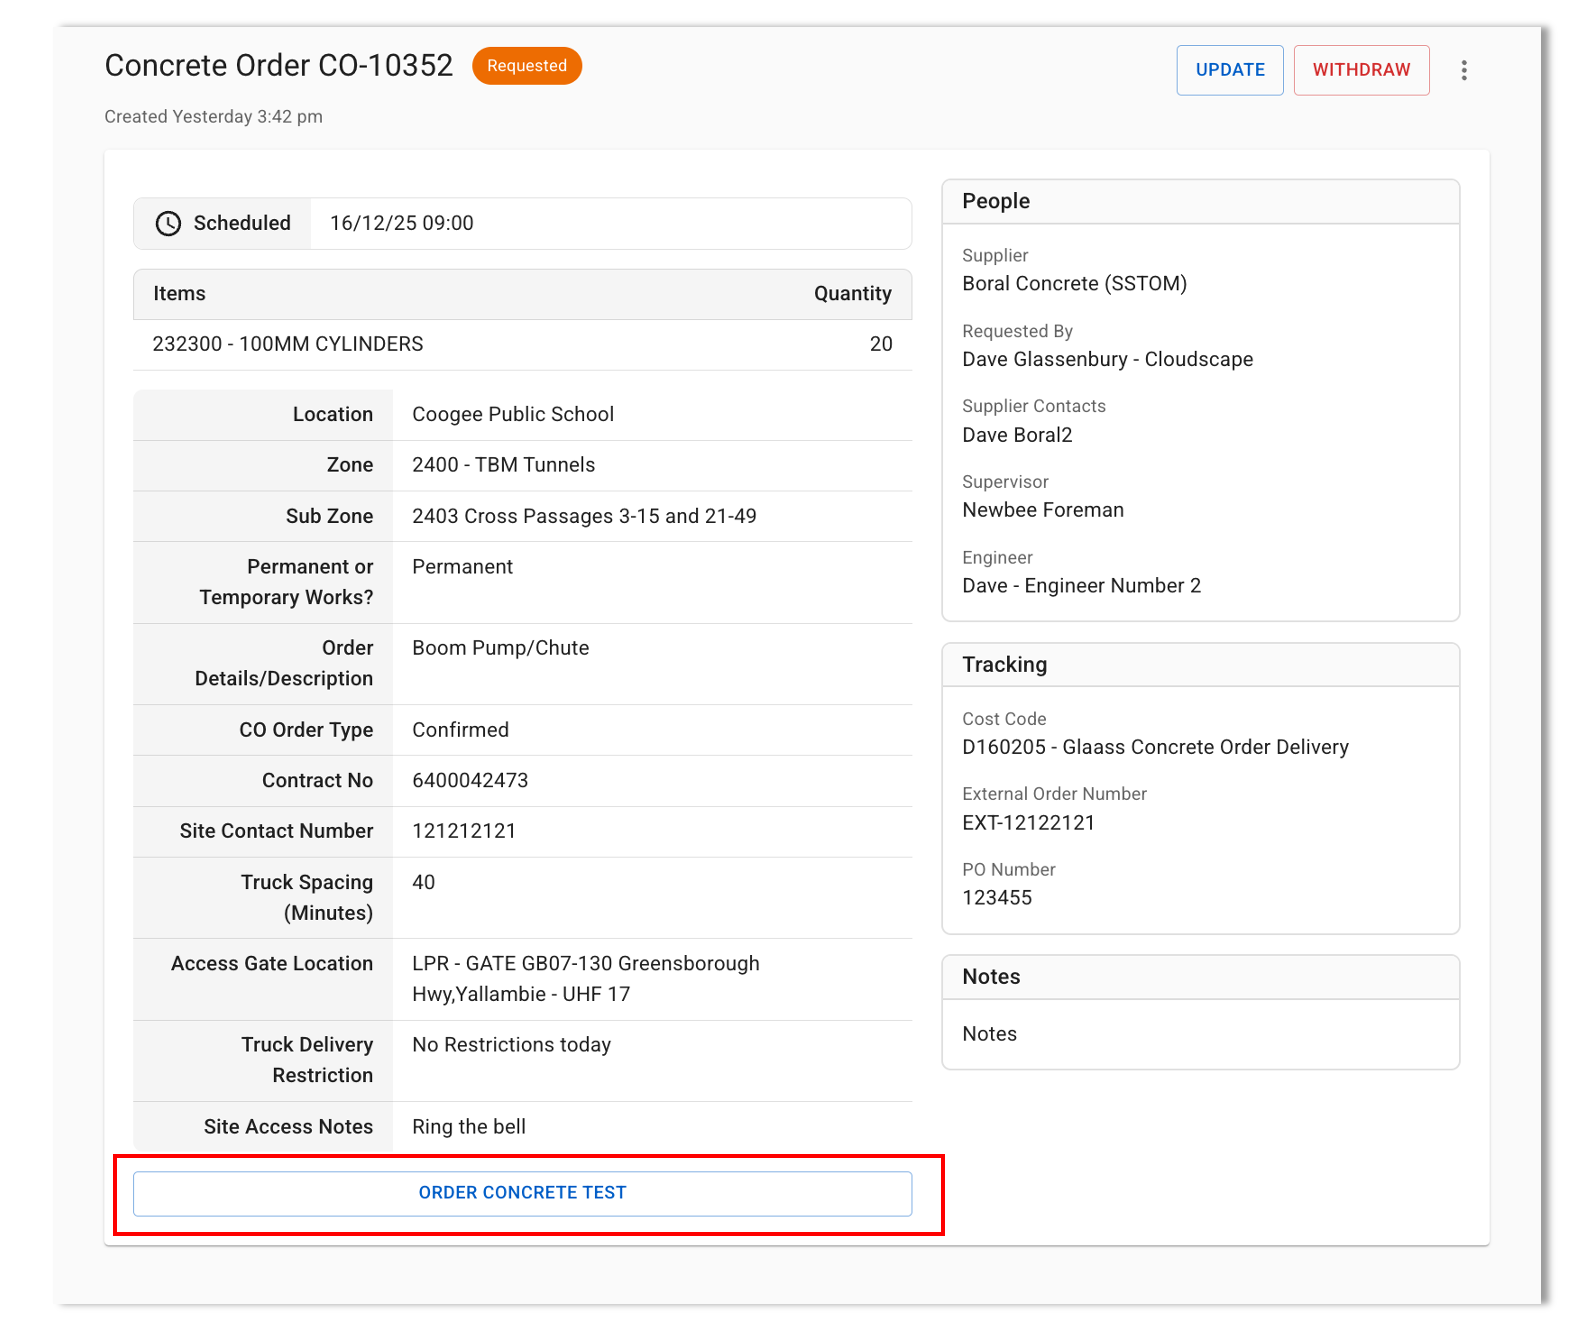
- The concrete test sub-order can be sent to the same supplier or a different supplier.
- The two orders will remain linked, for reference.
- Concrete orders with concrete sub-orders are indicated by a Link icon in the Orders List. Users can click on the link to view a sub-order summary dialog. Clicking on the dialog will open the concrete test order page to view the details.
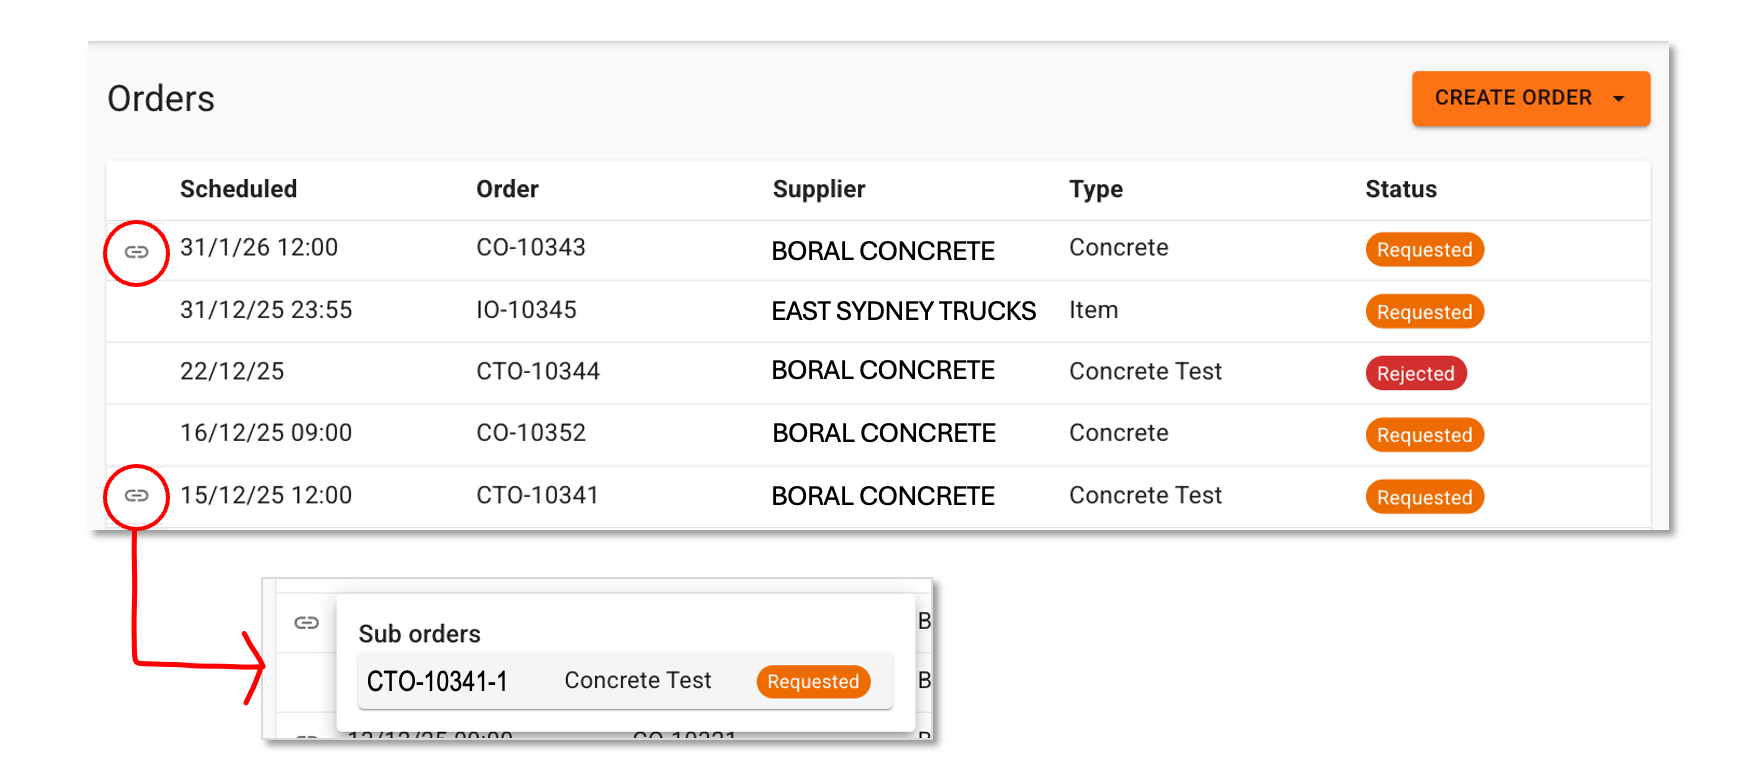
- To display all sub-orders, tick Show Sub Orders in the filter panel.

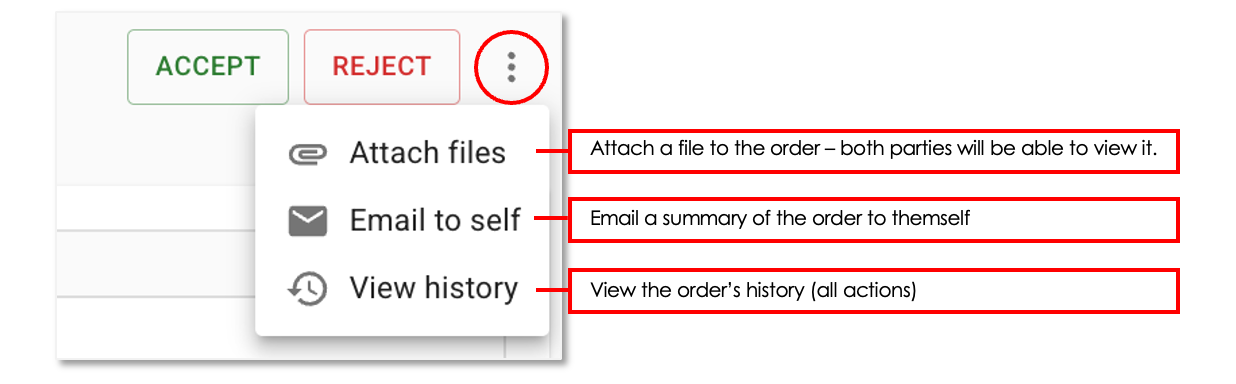
More Order Actions -
From within an order form, the order creator can press the hamburger icon beside the Update / Withdraw buttons to perform a number or order actions.

-
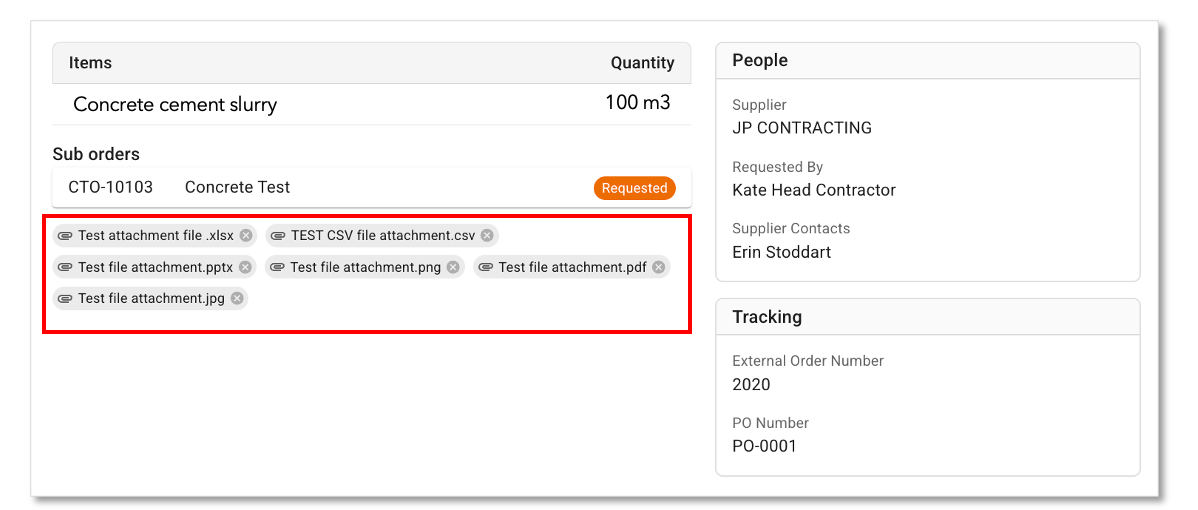
Attach Files
Files can be added to any order by:
- Clicking the hamburger icon (⋮) beside the order.
- Selecting Attach files.
- Uploading any file type (e.g., PDFs, images, spreadsheets).
- Images display as previews.
- PDFs open in a new tab.
- All other attachments will download to your computer.
NOTE: Suppliers who are assigned as the order's contact can also attach files.
-
Clone Order
Order details can be cloned to a new order by:
- Clicking the hamburger icon (⋮) beside the order.
- Selecting Clone order which will clone all of the details except - Scheduled Date, Scheduled Time, and if present, End Date and End Time.
-
Email to self
Email a summary of the order to yourself by:
- Clicking the hamburger icon (⋮) beside the order.
- Selecting Email to self.
NOTE: Users with a read-only view of an order are able to complete this action.
-
View History
View the history of the order by:
- Clicking the hamburger icon (⋮) beside the order.
- Selecting View history.
- A history dialog will display a timeline of the order from the newest action to the oldest action.
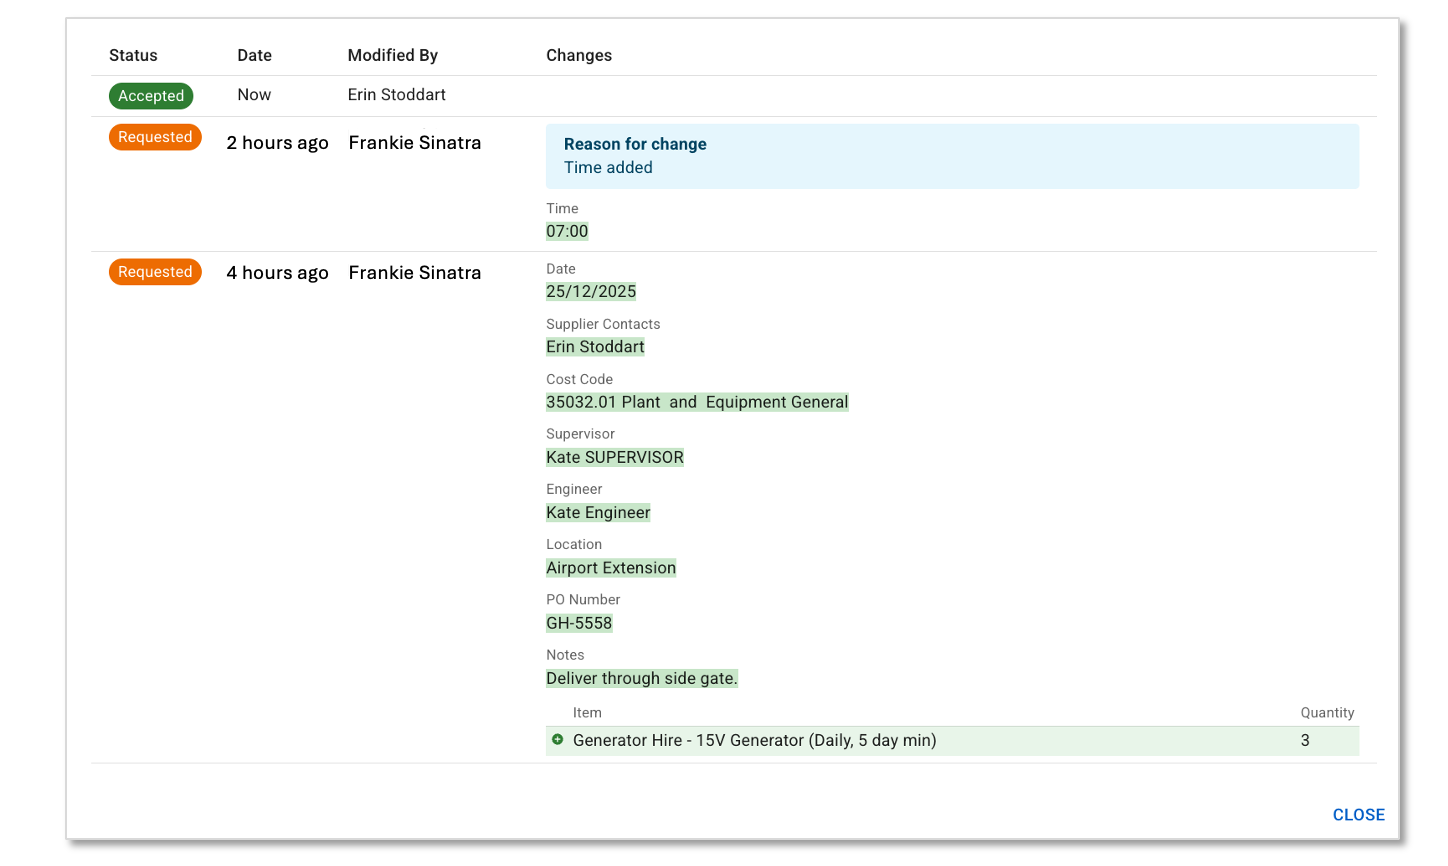
NOTE: Users with a read-only view of an order are able to complete this action.
Supplier Order Actions
The supplier will receive an email notification of a new order. The email will contain a link to the Orders Page (this also provides them access to the Orders Page).
They need to Accept or Reject the order.
- Accept - Supplier can complete the order
- Reject - Supplier cannot complete the order
The order creator will be notified of the supplier response by an auto-generated email and the order label will update to Accepted or Rejected.
From the hamburger icon (⋮) beside Accept and Reject buttons, suppliers can:
- Attach files to the order - available only if they are assigned as the order's contact
- Email a copy to themselves
- View the order history
Link Concrete Orders to Delivery Dockets
Where delivery dockets have been generated via an API, the VS will match the following values to link a concrete order to a delivery, if possible.
- VS concrete order number (CO-xxxx) - this number will then display at the top of the resulting docket in the PO field.
- Purchase order number.