Create an Item Code
Item codes are individual chargeable items that subcontractors or internal staff select when creating electronic dockets in the SafeSite app.
The steps for creating item codes vary depending on your version of Virtual Superintendent. This article explains the process for projects that have Sign-on Profile enabled.
For these projects, the Dockets Setup page includes a Sign-on Profiles option on the tabs bar at the top of the page:

In this article
Permissions
To access the Dockets Setup page (Menu > Dockets Setup) where item code are managed, you must have one of the following permissions enabled:
- Dockets Super User
- Admin Manager
Create an Item Code
To create an individual item code:
- Sign in to Virtual Superintendent.
- Open the Dockets Setup page (Menu > Dockets Setup).
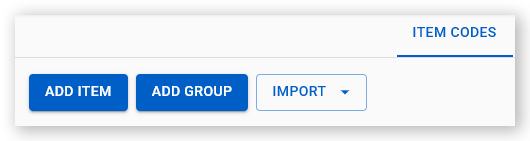
- Click the Item Codes tab.
-
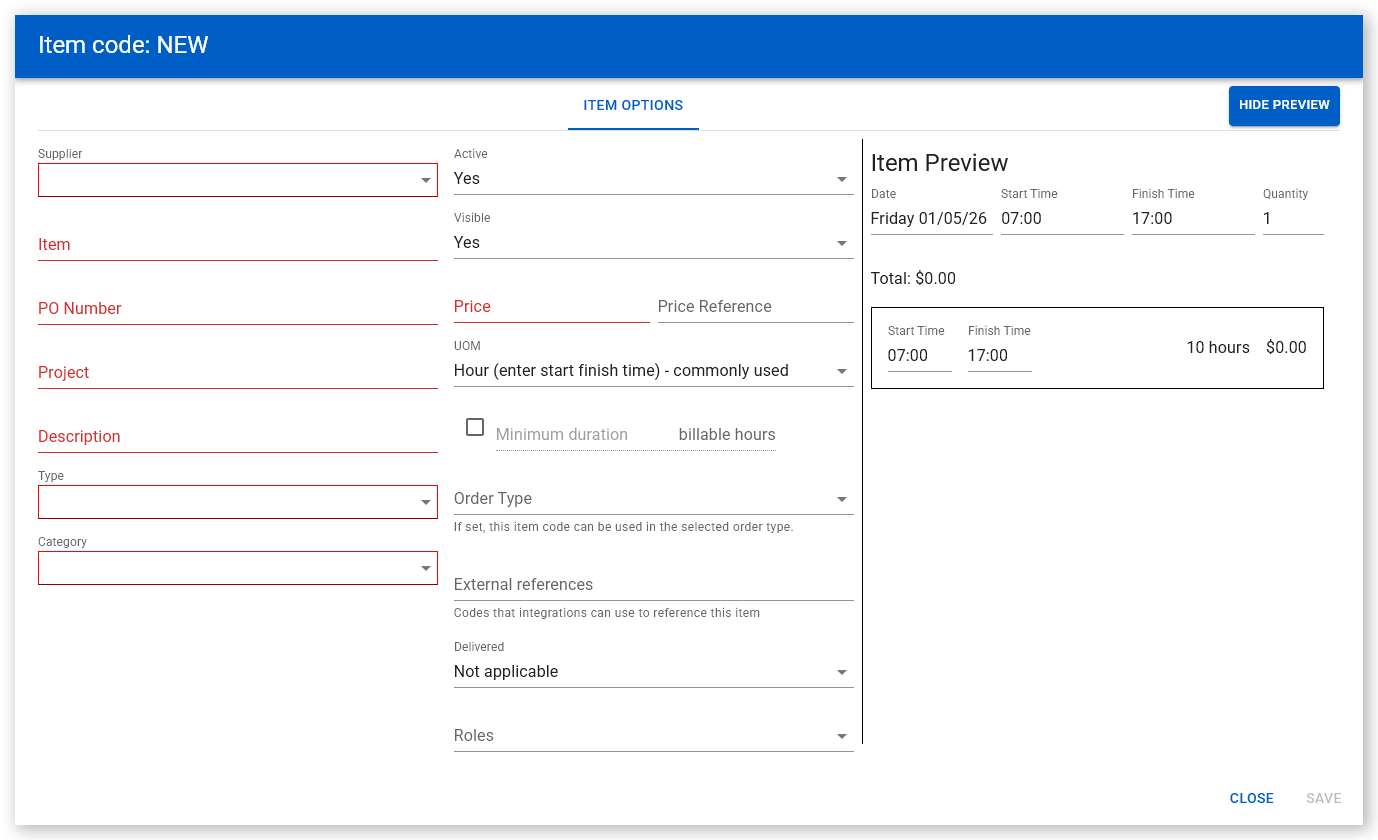
Click Add Item. The Item Code: New dialog opens.
 Click or tap to expand image
 -
Enter the details of your new chargeable item into the dialog. See field details.
 Click or tap to expand image
 - Click Save.
Field details
The following fields are available on the Item Code: New dialog:
| Field | Description | Notes |
| Supplier | The supplier this item code is used for. | Select from the dropdown list. |
| Item |
A brief code used by your financial system.
|
—
|
| BPA number | Reference number used for financial exports. | If not used by your organization, enter any value. |
| Project | Project number used for financial system exports. | If not used by your organization, enter any value. |
| Description |
A short description of the chargeable item. See Description best practices below.
|
Use consistent naming (for example, CW1, CW1 Double Time, CW2 Laborer Double Time). Subcontractors see this text when creating dockets in the SafeSite app. Consistent descriptions also simplify item code grouping.
|
| Type | The type of chargeable item. | Select from the dropdown list. See Item Code Types below. |
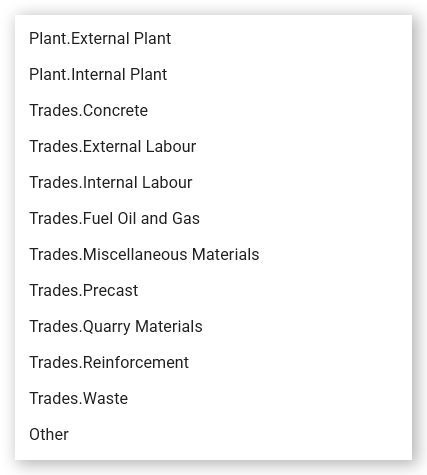
| Category | The category assigned to the chargeable item. | Select from the dropdown list. See Item Code Categories below. |
| Active | Controls whether the item can be used by subcontractors to generate dockets. |
Yes: Visible and usable in SafeSite and Virtual Superintendent. No: Hidden from subcontractors but still usable in item code groups.
|
| Visible | Controls whether the item appears in SafeSite. |
No hides the item from direct selection but allows use within item code groups.
|
| Price |
The unit price for the item.
|
See Edit an Item Code Price below |
| UOM |
The unit of measure used to charge the item.
|
For timesheet suppliers, the UOM must be Hours‑Quantity.
|
| Minimum billable hours | Check the box if a minimum billable-hours value is required for the item. | When checked, enter the minimum billable-hours value. |
| Sign-on profile | The sign-on profile used in SafeSite. | Controls how users sign into SafeSite. Either default profile, or a custom profile. See Sign-on Profiles below. |
| External references | Integrations setting. | Contact support for more information. |
| Delivered | Integrations setting. | Contact support for more information. |
| Roles | Integrations setting. | Contact support for more information. |
Note: As you complete the fields for the new item code, a preview of the item as it would appear in a docket is shown to the right. Hide this preview by clicking Hide Preview.
Description best practices
Use clear and consistent language in the Description field.
For example:
- CW1
- CW1 Double Time
- CW2
- CW2 Laborer Double Time
Subcontractors see the description when creating dockets in the SafeSite app. Clear and consistent descriptions make it easier to select the correct item. Consistent naming also simplifies item code grouping.
Active and visible settings
When setting visibility, note the following behavior:
- Active = Yes - The item code appears in selection lists in the SafeSite app and can be used in electronic dockets.
- Active = No - The item code does not appear in selection lists but can still be used as part of an item code group.
Sign-on Profiles
Sign-on profiles define the steps a SafeSite user must complete when signing on to SafeSite. When a user selects a chargeable item in a docket, the sign-on profile assigned to that item automatically determines the required sign-on steps.
Each project includes a set of default sign-on profiles. A default profile exists for each item code type, such as Labor, Plant, Material, and Other. When applied to item codes, these profiles control the sign-on workflow for users.
If the default sign-on profiles do not meet project requirements, you can create custom sign-on profiles.
For instructions on creating custom profiles, see the Sign-on Profiles Explained help article.
Item Code Types
The Type field defines the type of docket that is generated, such as a labor docket. This information is used when exporting data to your financial system and when analyzing costs in reports and dashboards.
Item code types help categorize costs so you can better understand where spending occurs across projects and activities.
The Item code type list shows all available types. If a suitable type is not available, select Other and contact support@virtualsuper.com to discuss adding a new type.

Item Code Categories
The Category field further classifies each chargeable item. This information is used when exporting data to your financial system and when analyzing costs in reports and dashboards.
Item code categories help you better understand where costs accrue across projects, activities, and suppliers.
The Item code category list shows all available categories. If a suitable category is not available, select Other and contact support@virtualsuper.com to discuss adding a new category.
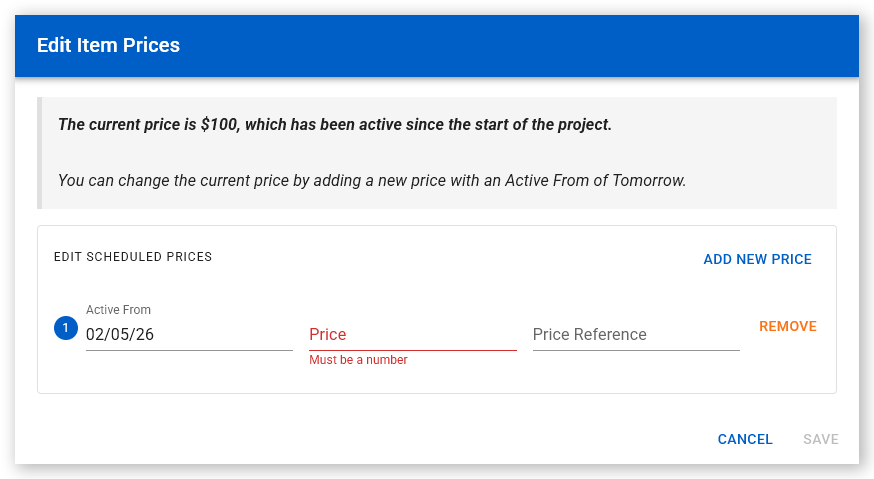
Edit an Item Code Price
You can update the price of an existing item code to reflect future pricing changes.
- Sign in to Virtual Superintendent.
- Open the Dockets Setup page (Menu > Dockets Setup).
- Click the Item Codes tab.
- Locate the item code you want to update in the grid and click it. The Item Code dialog opens.
-
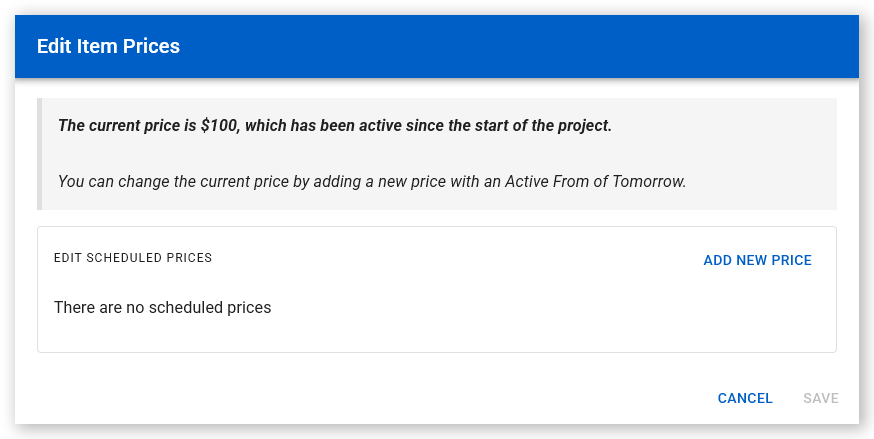
Click Edit next to the Price Reference field. The Edit Item Prices dialog opens.
 Click or tap to expand image
 -
Click Add New Price. The dialog expands.
 Click or tap to expand image
 - Set the Active From date using the date picker.
- Enter the new Price and, optionally, add a Price Reference.
- Click Save.
Important notes
- The earliest Active from date you can select is tomorrow. You cannot change prices for the current day.
- You can edit or delete scheduled prices before their Active from date.
- Only one price change is allowed per item code per date.
See the Schedule a Future Item Code Price help article for more information.
Create Item Codes From a Spreadsheet
You can create item codes in bulk using an Excel template. This speeds up setup when you need to add multiple chargeable items to a project.
For step‑by‑step instructions, see the Bulk Import Item Codes Using an Excel Spreadsheet help article.