
The Jobs Page
Note: This is a draft document describing features that are currently in progress and under active development. This guide is intended for use by preview customers. As a result, some of the behavior or features described may be inaccurate or out of date.
Use the Jobs page (Menu > Jobs) to create, manage, and track work being performed by your organization. Jobs allow you to define work areas, assign workers and plant equipment, organize resources into work groups, and automatically generate dockets.
Unlike standard Virtual Superintendent workflows that are managed by head contractors, Jobs provide organizations with a self-managed way to plan and coordinate their own work activities and track their progress using a simple yet powerful project cost dashboard. Each job includes a location, assigned resources, and a lifecycle that can be tracked from creation through to completion, archiving, or deletion.
This article explains how to create and manage jobs, assign work groups, start and finish jobs, use job-based filtering across Virtual Superintendent, and understand how jobs interact with automatic docket creation.
In this article
Permissions:
To access the Jobs page (Menu > Jobs) where jobs are created and managed, you must have the following permission:
- Job Admin
Projects in Virtual Superintendent that have the Jobs feature enabled also include the selectable Docket Creation SafeSite permission. This permission allows supervisors who also have the Docket Supervisor permission to create dockets on behalf of other suppliers in SafeSite.
When the Docket Creation permission is enabled, selecting Add Docket from the Supervisor Home screen changes the default docket wizard process, allowing supervisors to create dockets for other suppliers associated with the job, in addition to their own organization.
This feature allows supervisors to record unexpected deliveries from suppliers who aren't able to submit their own dockets at the time of delivery.
Understand the Jobs Page
The Jobs page displays a grid of job panels, with each panel representing a single job. Each panel includes the job location displayed as a map geometry, the current job status, the job name, and a summary of the work being performed. The color of the map geometry is determined by the job's specified color (set during job creation or when the job is edited).
To better identify job locations, the maps on these panels can be toggled between standard and satellite views using the Layers icon in the top-right corner of each map.
Job panels also provide quick access to Filter By Job buttons which allow you to view only locations, people, plant equipment, dockets, and other records associated with individual jobs across Virtual Superintendent.
Note: The job filter does not function on the SafeSite App Users tab of the Users page (Menu > Users) to avoid the accidental duplication of existing users.
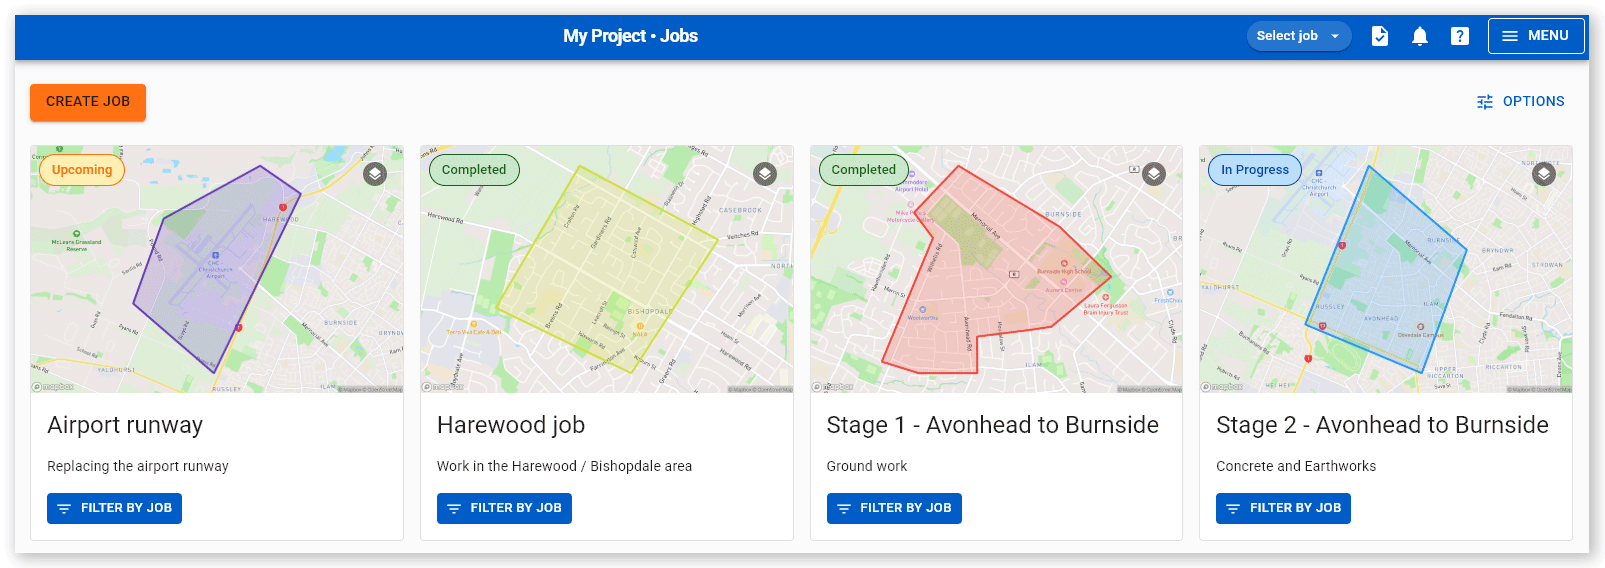
The status of each job is displayed as a label in the upper-left corner of the job panel. This status indicates the current stage of the job lifecycle, helping you see whether a job is waiting to start, actively being worked on, has been completed, archived, or deleted.
Jobs progress through a series of statuses as they move through their lifecycle. These statuses are:
| Status | Description |
| Upcoming | The job has been created and is waiting to start, or has been undeleted. |
| In Progress | The job has been set to started. |
| Completed | The job has been set to finished, or has been unarchived. |
| Archived | The job has been archived. Archived jobs are not shown by default on the Jobs page but historical dockets and quantities remain associated with the archived job. These jobs can be unarchived, changing their status to Completed. To view archived jobs on the Jobs page, click Options then select Show Archived. |
| Deleted | The job has been deleted. Deleted jobs are not shown by default on the Jobs page. These jobs can be undeleted, changing their status to Upcoming. To view deleted jobs on the Jobs page, click Options then select Show Deleted. |
Every job has a tag that is automatically created when the job is generated. This tag is assigned to the job location, represented by a map geometry, and to all workers and plant equipment assigned to the job. By linking these related entities together, the tag enables job-based filtering throughout Virtual Superintendent.
You can use this tag with the Job Filter to quickly view only the locations, workers, plant equipment, and other records associated with a specific job. This makes it easier to focus on work related to a particular job.
Alternatively, open the job list in the upper-right corner of the menu bar by clicking Select job and then choose a job to filter.
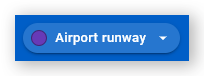
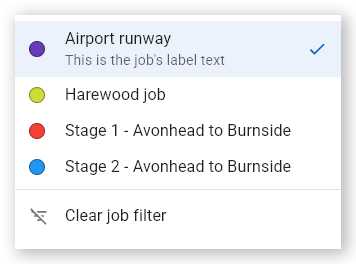
The job filter is available whenever the Jobs feature is enabled. If a job is selected from the dropdown, the job title is displayed in the filter, making it easy to see which job is currently being used for filtering. The filter can switch between jobs and clear the current job, and the selected job persists when opening new tabs, but is lost after signing out.
Every job can also be given a color to visually differentiate between jobs (this color is selected during job creation or when the job is edited), which is also shown on the filter and used to color the job's map geometry. If no color is selected, the job color defaults to grey.
To clear the filter, open the filter dropdown and click Clear job filter. Alternatively, select a different job from the list.
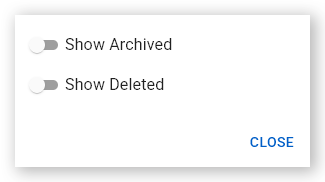
Use the Options button in the upper-right corner of the Jobs page to view archived and deleted jobs. Enable the Show Archived and Show Deleted toggles in the dialog that opens to display these jobs in the job list.
Click a job panel to open the Job Details page, where you can view and manage all information related to the job.
From this page, you can view the job status and location on a map, the job start date, duration and cost. You can also update job details, open dockets for the job, view quantities reports, change the job status, add or modify work groups, and manage the workers and plant equipment assigned to the job.
The Job Details page also provides options to start, finish, archive, restore, or delete a job, depending on its current status.
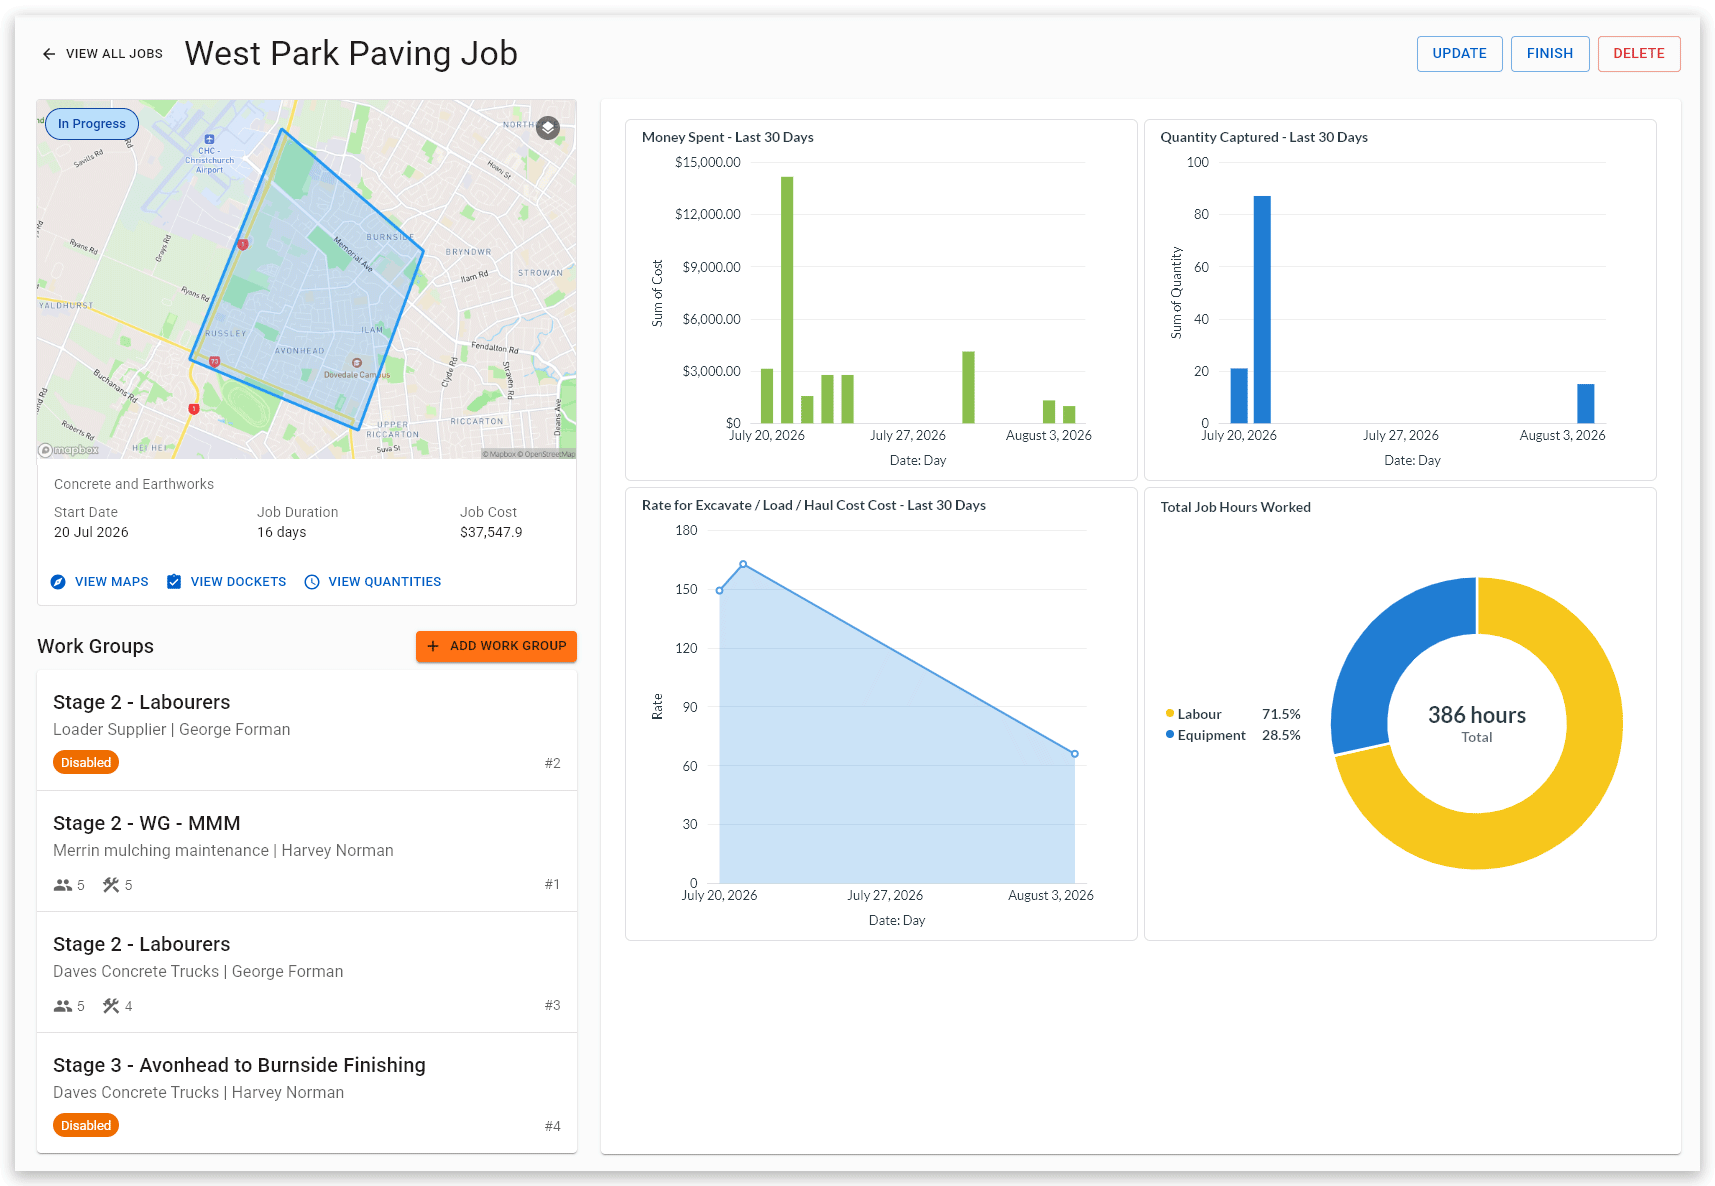
Three links are also available below the job map in the upper-left corner of the page:
| Link | Description |
| View Maps | Opens the Maps page (Menu > Maps) and filters the map to show the job location geometry. |
| View Dockets | Opens a Dockets page and filters the dockets shown to include only those for the job (those with the job specified in their Jobs fields). |
| View Quantities | Opens the Quantities report (Menu > All Reports > Create New Report > Quantities), showing costs and quantities recorded in dockets for the job. |
Once a job has started (In Progress), a dashboard to the right of the Job Details page shows the:
- Total cost of the job over the last 30 days or since the job was started, and the percentage change relative to the previous day (money spent)
- Quantity of cost code items recorded in dockets over the last 30 days for the job (quantity captured)
- Cost of excavation, loading and hauling over the last 30 days
- Number of hours worked by the people and plant equipment on the job (total job hours worked)
Hover your mouse over columns or segments on the dashboard graphs to view cost and quantity details for individual days.
Note: To return to the Jobs page, click View All Jobs in the upper-left corner of the Job Details page.
Quick Start Guide
Getting started with jobs involves five basic steps:
- Create a job by entering a name and by defining the work area on the map.
- Add one or more work groups to the job and assign the required workers and plant equipment.
- Start the job when work begins. Jobs only generate automatic dockets while they are In Progress.
- Monitor and update the job as work progresses on the job dashboard. You can edit job details, modify work groups, and use Filter By Job to view related locations, people, plant equipment, and dockets throughout Virtual Superintendent.
- Finish the job when work is complete, then archive or delete it if it is no longer required.
After a job is started, Virtual Superintendent automatically creates up to three dockets each workday for each active work group: a People docket, a Plant docket, and an SMU Plant docket.
Note: Empty dockets aren't created, disabled work groups don't generate dockets, and automatic docket generation excludes weekends.
Create a New Job
To create a new job:
- Sign in to Virtual Superintendent.
- Click Menu > Jobs. The Jobs page opens.
- Click Create Job. The Create Job panel opens.
- Type a job name into the Name field. This field is required.
- Type a brief description of the job into the Description field.
- Click the square in the Geometry field to specify the job location. This field is required. The Geometry dialog opens, showing a map. Pan and zoom the map to the new job’s location, then left click a location to begin drawing a map geometry (the geographic boundary that the job will take place within). A dotted line connects each point as you click more locations with your mouse. To complete the new geometry, double-click the mouse. The geometry is created. If you make a mistake, click Reset to clear the geometry and try again.
- Click Save. The geometry is saved and the dialog closes.
- Type an alternative name for the job in the Label field, if needed. Use this field if the job name is too long or to replace it with a more memorable name. As you type, a preview of the title is shown in the Display Label field. This label is shown under the job name in the Job Filter and is optional.
- Select a job color, if needed, by clicking a colored circle in the Colour section. This is the color that will be used to identify the job in the Job Filter, in dockets, and when selecting a job for a docket in the SafeSite app. Job color is optional.
- Click Create. The new job is created and added to the Jobs page with a status of Upcoming.
When a new job is created, a tag is created using the job’s name. The new job location geometry is tagged with the job name allowing it to be filtered on the Maps page. The people and plant equipment assigned to the job are also assigned the job tag while they are part of a work group and then untagged when removed (but remain tagged if their workgroup is only disabled).
This tag is used by the Job Filter to show only items associated with the job (geometries, people, plant equipment) by clicking the Filter By Job button on individual job panels on the Jobs page.
Note: When a job is created, its location geometry is also added to Virtual Superintendent and can be viewed on the Maps page (Menu > Maps). To display job locations, open the Layers tab and enable the required job location under the Jobs layer. These geometries do not use the specified job color. For more information about viewing geometries and managing map layers, see the Maps Page help article.
Configure and Manage a Job
Add work groups
Work groups are used to organize the people and plant equipment required to complete a job. A work group can include workers and plant equipment, workers only or plant equipment only.
A job can contain multiple work groups, allowing you to represent different crews, shifts, or teams. Work groups can be enabled or disabled individually, making it easy to rotate resources as the job progresses.
To add a work group to a job:
- Sign in to Virtual Superintendent.
- Click Menu > Jobs. The Jobs page opens.
- Click the job you want to edit. The Job Details page opens.
- Click Add Work Group. The Add Work Group panel opens on the Details tab.
- Type a work group name into the Name field. Use a descriptive name that describes the group or its role (for example, "Equipment" or "Night shift"). This field is required.
- Select a supplier from the Supplier dropdown list. This is typically the name of your own company if you are a supplier, and the workers and plant equipment used for the job must be assigned to this company. This field is required.
- Select a supervisor from the Supervisor dropdown list. This person will be added to dockets for the job. This field is required.
- Click Next. The page advances to the People tab.
- Open the Search People dropdown and select the people (SafeSite users) who will work on the job, if any. Their roles are also shown under their names. The selected workers are added to the page. Remove individuals by clicking the delete icon to the right of their name.
- Click Next. The page advances to the Plant tab.
- Open the Search Plant dropdown and select the plant equipment that will be used on the job, if any. Equipment roles (types of equipment, for example "Concrete Mixer" or "Excavator") are shown under each plant ID. The selected equipment is added to the page. Remove individual plant items by clicking the delete icon to the right of an item's name.
- Click Add Work Group. The new work group is created and added to the Job details page. The name of the work group, the supplier, supervisor, and the number of people and plant items in the work group are shown.
Important: Automatic docket creation requires a valid item code for every worker and piece of plant equipment in a work group. When workers or plant equipment are added to a work group, any person or plant item that has multiple item codes but no default item code is treated as not having a valid item code.
Warnings are displayed in the work group wizard and in the Job Details panel under Work Groups for any workers or plant equipment without a valid item code. A default item code must be selected for these workers or plant items before the job begins.
Note: For information about adding new SafeSite users and on-boarding plant equipment, see the Register New SafeSite Users and On-board and Manage Plant Equipment help articles. Adding either requires the User Admin permission.
After a work group containing people or plant equipment is created, and the job is started (changing its status to In Progress), Virtual Superintendent automatically creates People and Plant dockets each day after 3 AM project time (excluding weekends, by default).
Separate dockets are created for each work group:
- One People docket for assigned workers.
- One Plant docket for assigned plant equipment (excluding SMU-tracked plant).
- One SMU Plant docket for SMU-tracked (using data from, for example, a Digital Matter unit) assigned plant equipment, containing separate line items for each tracked plant item. This docket is only created if one or more of the assigned SMU-tracked units have signed in.
If a work group contains only people or only plant equipment, only the relevant docket type is created.
The workers and non-SMU plant equipment assigned to the work group are automatically added as chargeable items on the draft People and Plant dockets, and any SMU-tracked plant equipment that signed in on the day is added to the draft SMU Plant docket. A new set of dockets is created each weekday while the job remains in the In Progress state (and only when the dockets created are not empty).
Note: You can view these job-generated dockets by clicking View Dockets on the relevant Job Details page. Dockets pages (for example, Menu > Dockets) on projects with the Jobs feature enabled also include a Job column that can be used to filter dockets by job.
Job-generated dockets automatically include:
- The job name (read-only in the Jobs field, together with the selected job color).
- The job location.
- The assigned supervisor.
- Read-only identifying text in the Docket Remarks field using the following format:
[Job Name] - [Work Group] - [People or Plant or SMU Plant]
For example:
- Parking Lot Paving - Crew Team 1 - People
- Parking Lot Paving - Crew Team 1 - Plant
- Parking Lot Paving - Crew Team 1 - SMU Plant
Note: When the Jobs feature is enabled, selecting a job becomes part of the SafeSite docket creation process. Selecting a job is required, only one can be selected, and this selection becomes read-only after saving.
When viewing dockets, the job name (or its short name) and configured job color are shown in the Job field, and beside the docket on the My Dockets screen. For supervisors, the job name and color are also shown on the Approve Dockets screen.
Edit a work group
Once a work group has been created, it can be updated to change the workers and plant equipment assigned to it. Work groups can also be disabled when they are no longer required or when resources need to be temporarily removed from the job.
Disabling a work group prevents the automatic creation of new daily dockets for the workers and plant equipment assigned to that work group, while retaining the work group configuration so it can be re-enabled later if required.
Note: Disabled work groups are identified by an orange Disabled label under the Work Groups section of the Job Details page.
To edit a work group:
- Sign in to Virtual Superintendent.
- Click Menu > Jobs. The Jobs page opens.
- Click the job you want to edit. The Job Details page opens.
- Click the work group under the Work Groups section. The Work Group Details panel opens.
- Click the pencil icon beside the People or Plant headings to open an editor dialog. Remove any people or equipment you no longer want in the work group by clicking the Delete icon beside. Add people or plant by searching for SafeSite users or plant in the Search People or Search Plant fields and selecting them.
- Click Save.
Click the More items menu (three vertical dots) to open a contextual menu and select Disable work group if you don't want the work group to generate dockets.
To re-enable a disabled work group, open the work group and click Enable in the yellow alert bar at the top of the Work Group Details panel.
Edit a job
To edit the name, description or location of an existing job:
- Sign in to Virtual Superintendent.
- Click Menu > Jobs. The Jobs page opens.
- Click the job you want to edit. The Job Details page opens.
- Click Update. The Job Summary panel slides open.
- Edit the text in the Name or Description fields to edit these details.
- Click the map in the Geometry area to edit the job location. The Geometry dialog opens. Drag within the geometry on the map to move it without changing shape, or drag any corner or drag point (orange dots on the dotted-line geometry border) to adjust the geometry shape, then click Save. The dialog closes.
- Edit the text in the Label field to add, remove or edit the job's short description.
- Select a new job color by clicking a different colored circle in the Colour section.
- Click Update. The job details are updated.
Start a Job
When a job is first created, its status is set to Upcoming. While a job is in this state, it can be configured and assigned work groups, but it will not generate dockets.
To begin work and enable automatic docket creation, the job must be started. When a job is started, its status changes to In Progress. Only jobs with an In Progress status can generate daily dockets.
To start a new job:
- Sign in to Virtual Superintendent.
- Click Menu > Jobs. The Jobs page opens.
- Click the job you want to edit. The Job Details page opens.
- Click Start. A confirmation dialog opens.
- Click Start to confirm the job start. The job's status changes to In Progress.
Finish a Job
When a job is completed, its status should be changed to Completed. This stops automatic work group docket generation while retaining the job and its historical information for reporting purposes. Completing a job also frees up an active job slot.
Note: Completed jobs remain available for manual docket creation but no longer generate automatic work group dockets.
To finish a completed job:
- Sign in to Virtual Superintendent.
- Click Menu > Jobs. The Jobs page opens.
- Click the job you want to edit. The Job Details page opens.
- Click Finish. A confirmation dialog opens.
- Click Finish to confirm the job completion. The job's status changes to Completed.
Archive a Job
To archive a job:
- Sign in to Virtual Superintendent.
- Click Menu > Jobs. The Jobs page opens.
- Click the job you want to archive. The Job Details page opens.
- Click Archive. A confirmation dialog opens.
- Click Archive to confirm that you want to archive the job. The job is archived, its status is updated to Archived, and it is no longer shown on the Jobs page.
Note: You can restore an archived job by opening the job and clicking Unarchive, then confirming the action. When a job is unarchived, its status changes to Completed, making it visible on the Jobs page again.
Delete a Job
Note: If you need to re-use a job in the future, such as for recurring or repeat work at the same location, you can delete the job and then restore it using Undelete. Restoring a deleted job changes its status to Upcoming, allowing you to update the job details, work groups, or location as required before starting it again when needed.
To delete a job:
- Sign in to Virtual Superintendent.
- Click Menu > Jobs. The Jobs page opens.
- Click the job you want to delete. The Job Details page opens.
- Click Delete. A confirmation dialog opens.
- Click Delete to confirm that you want to delete the job. The job is deleted, its status is updated to Deleted, and it is no longer shown on the Jobs page.
Note: You can restore a deleted job by opening the job and clicking Undelete, then confirming the action. When a job is undeleted, its status changes to Upcoming, making it visible on the Jobs page again.